When you’re loading up the brush with the paint for the streaky background, be careful of how much black you use. It’s so strong, you really only need a touch.
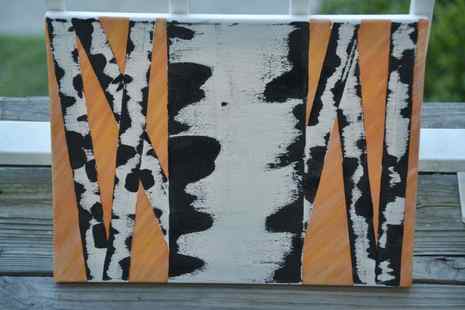
DIY Birch Tree Painting Tutorial
There’s something incredibly therapeutic about rolling up your sleeves and putting brush to blank canvas. It relieves stress and eases anxiety. Whether you’re an artist or a stick figure scribbler, it’s just fun -no qualifications necessary.
Moreover, there’s a deep sense of satisfaction in creating something that you’re proud enough of to display in your own home. For me, it’s a part of the enchantment of trying new things; discovering a propensity for something you’d never have imagined yourself capable; gaining a greater sense of confidence by deciding “maybe I can” instead of “I could never”.
This simple DIY painting project is one of those things you just ought to try. It’s quick, easy and leaves you feeling like the owner of your own Mona Lisa.
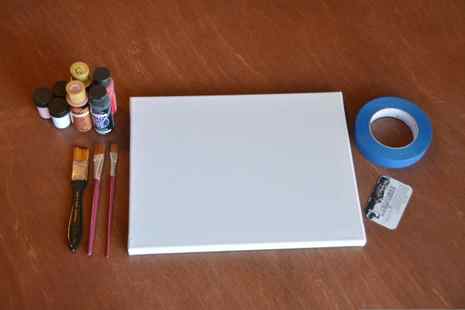
Begin by deciding what you want your color scheme for the background to be and getting your paint. I used 79¢ acrylic paint from Hobby Lobby (on 30% clearance –boom goes the savings dynamite!). Then you just need a canvas, painter’s tape, paint brushes and an old credit or gift card.
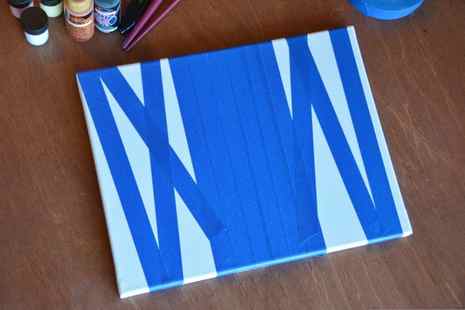
Use the tape to mark off your tree pattern.
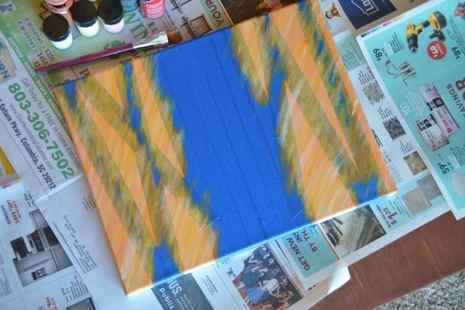
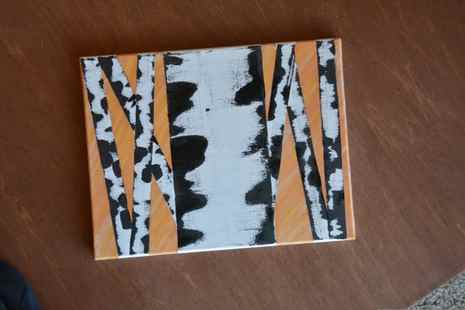
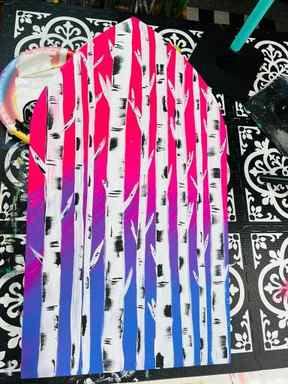
Then just fill in your background. I’ve mainly seen these types of birch tutorials done with a solid background, but I wanted a little more color going on in mine.
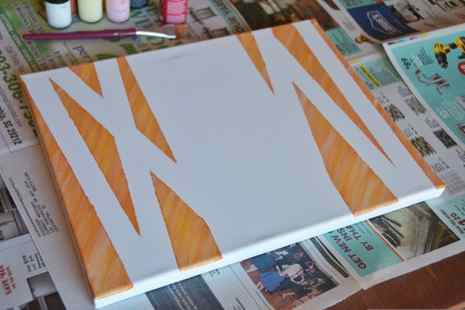
Wait a bit for the paint to dry, then remove the tape. If you’re worried about getting your lines right for crossing trees, you can leave the tape on for your front tree to make sure you don’t accidentally smear it while you create the background tree. I had practiced this on several canvases, so I was feeling brave.
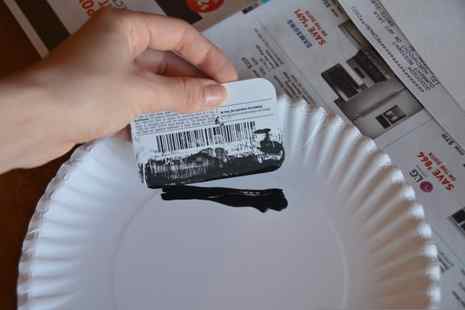
Here comes the trick so easy if feels like getting away with a crime… Take your old gift card and dip the edge in black paint.
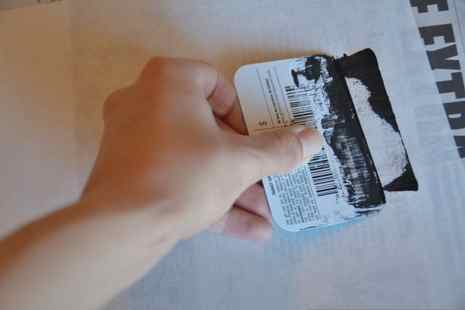
Practice scraping it across a piece of scrap paper to create the birch bark pattern.
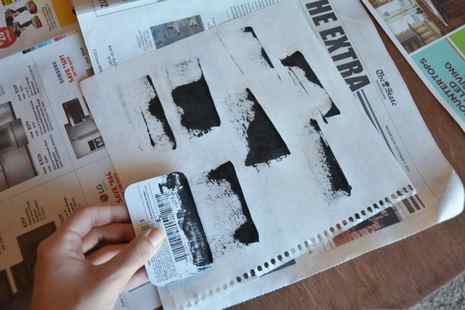
Experiment until you feel like you have a feel for just the right paint to scrape ratio of the side and darkness of the bark pattern you want.
Then get to scraping!
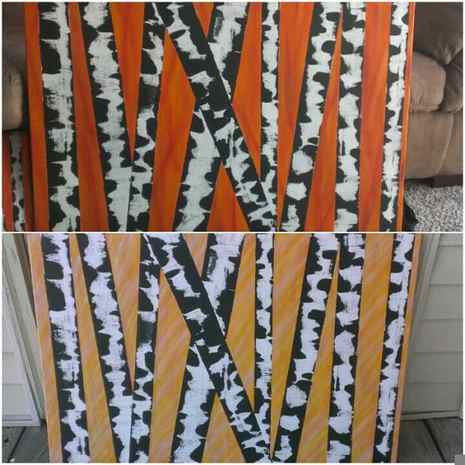
Don’t be afraid to make mistakes -if you try a color scheme and it comes out too light or dark, never underestimate the power of blending. When I first tried this on my big canvas, it came out looking like a poorly executed Smokey Bear commercial. I just taped my trees up again, busted out my brush and some lighter colors until I felt like no one was going to pop into my living room and say “only you can prevent forest fires”.

My initial large canvas didn’t quite fill up the wall space I had hoped it would. (That’s what you get for buying a canvas based on gut instinct rather than living room measurements.) I ended up adding some accent canvases and personalizing two of them by writing our last name on one and our wedding date on the other.
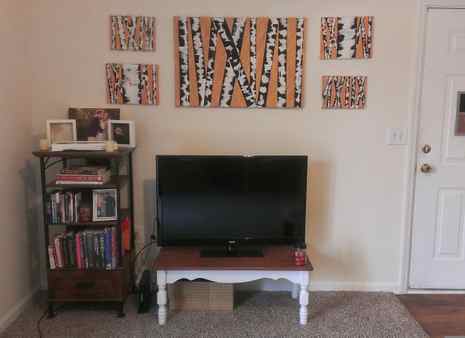
We aren’t allowed to paint the walls in our apartment, so we’ve kind of been battling the whole, white-washed insane asylum look since we moved in. I’ve done photo canvas collages on two other walls in the same open area, so I felt like this wall needed something different -I really enjoy how the paintings filled the space and added a spark of color. And that by creating your own paintings, you have the ability to really customize your wall art to match whatever color scheme you have going with your curtains and furniture.
So get cracking and try creating your very own birch tree masterpiece!
All writing and images copyright © 2015 Rachel Elise Weems Woods
What is a Word of The Year?
It’s just a word that you are going to focus on for the whole year. I used to do resolutions but never stuck to them. My word of the year? FOCUS! As an artist and paint party business person I can go in 100 different directions. But what I have learned is if you take just one or two things, and really, really focuse on those, you can make magic happen. Choose your word of the year, paint it, write in sharpie, put it somewhere you can see it every day.
Focus
I’ve been reading a lot lately and right now I’m reading a book called “The One Thing”. It is about focusing on one thing. As you start 2023, remember if you have too many things going on, it could stall your progress for paint parties and your business. Planning what you want to happen is so important. Get those plans on your calendar, don’t fall in to the rate race that I fell in to years ago. I let life always happen to me. I have plans all the way through December!
Part of my plans for this year is to make Paint Party Headquarters even better. This birch tree painting that I’m teaching you today is available to members of Paint Party Headquarters to use for their businesses. Now let’s learn how to paint!
Fun Birch Tree Painting
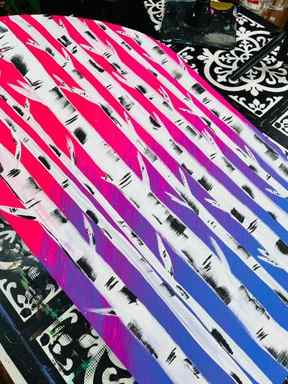
I grabbed some bright DecoArt paints in Dragonfruit, Fuschia Pop and Perfect Peri. These colors are going make a fun ombre background for this painting. Start with the Dragonfruit at the top, Fuschia Pop in the center and little Perfect Perri at the bottom. Take a chip brush to start covering your canvas with the paint, then just dry brush at an angle to blend the colors and create an ombre effect.

Using a credit card to paint
When you paint with a credit card, you have a bit less control of the patterns created by the paint. This is a good thing because it looks really random and natural.
For the control freaks and perfectionists among us, it’s a good exercise in letting go… (I’m absolutely not speaking from experience. Ahem.)
And please, make sure you use an old card. Don’t use your current one! The paint dries so quickly that it probably won’t come off completely when you’re finished.
You could use a piece of cardboard if you don’t have an old credit card handy, and of course a palette knife would work too!
Drying your birch tree painting
It’s really important to make sure the paint is fully dry in between each step. Although acrylic paint dries really quickly (too quickly sometimes!) you can speed it up with a hair dryer.
I’ve heard that hair dryers can cause some paints to darken in colour. I think it’s something to do with the heat, although I’ve never experienced this personally. But just bear this in mind when you’re painting.

How To Paint A Winter Birch Tree Painting
Supplies needed
- Watercolour or acrylic paper, or some other thick paper (I used Daler Rowney Mixed Media paper)
- Masking tape (if you want the painting to have clean edges)
- Blue acrylic paint (I used phthalo blue)
- Black acrylic paint (I used mars black)
- White acrylic paint (I used titanium white)
- A medium flat paintbrush (I used a 1 inch brush)
- An old credit/loyalty card (or a piece of cardboard or palette knife, if you have one)
Step one
Start by masking off the edges of your paper. Don’t worry about this step if you’re not worried about your painting having neat edges.
Step two
We’ll start by painting the background. Start by picking up a lot of white, a little blue, and a tiny, tiny touch of black on the brush. Paint horizontally across the page, back and forth.
As you move down the page, pick up more paint, adding more blue and more black the further you go down. When you get to the bottom of the page, just use a combination of blue and black – no white.
Let the painting dry.
Step three
Mix a light grey from a lot of white, a little black, and a tiny touch of blue. Paint the trunks of the trees in. Don’t worry if they’re a little wobbly – that just makes them look more natural!
Odd numbers tend to look best, but paint as many trees as you like.
Let the painting dry.
Step four
Make sure your brush is really clean and dry (or use another the same size). Pick up some pure white and dry brush it across one side of each tree trunk, roughly across half of the tree, or a little more. Keep the strokes horizontal.
It doesn’t matter which side of the trees you paint the white on, just make sure you are consistent and paint the same side of each tree.
Let the painting dry.
Step five
Take your credit/loyalty card and pick up a little black paint along one edge. Put the edge of the credit card against the page and drag it across.
Do this on both sides of the trees, keeping the strokes horizontal. Try not to go back over it again and again though, or you will destroy the pattern.
Let the painting dry, then remove the masking tape. Your birch tree painting is now finished!
For a wintery drawing project, try this: How To Draw A Winter Woodland Scene!
Or if you’re ready to learn more about acrylic painting, check out this article: Acrylic Painting Terms: A Glossary For Beginners!
Did you enjoy this tutorial? Let me know in the comments!
Sign up for my monthly emails of creative tips, tutorials and DIYs and get 31 free creative prompts!
Thank you!
You’ve successfully signed up for my fortnightly email updates and free creative prompts.
Check your inbox to confirm your choice and download the prompts
You can unsubscribe at any time
About Stacey
I’m Stacey and I’m a blogger, abstract artist and freelance writer. My aim is to help busy people feel inspired and get more creative with tutorials, hints and tips.
I live in Cardiff with my partner and dog, and in my free time you’ll find me hiking, reading, painting or sampling a craft beer or two.


