Erase any unnecessary pencil lines to make your sketch look cleaner.
How to Paint a Winter Snow Globe Card
Are you ready to send a cozy winter greeting? How does a watercolor hand-painted greeting card sound?! Today I’ll show you a step-by-step watercolor tutorial with negative-space painting techniques! I know this sounds scary, but I promise, it’s all bark and no bite! In this tutorial, the first and second steps will start slow with simple shapes, and in no time, you’ll be making a fine illustration by combining those same simple shapes. I’m so excited to create this beautiful snowy scene with all of you! There’s a ton of different ways to paint this scene, so feel free to learn more about negative space painting techniques and then paint the scene in your own way!
Supplies

- Watercolor paper
- Watercolors
- Opaque white watercolor
- Watercolor brushes
- Palettes
- Drawing gum
- Compass or circular can (anything that can create a circle!)
Step 1: Practice how to paint negative space

Your first practice round is a round shape. Draw a few snowmen from the bottom to the top of your page. Apply clean water around the center of your snowmen, but try to avoid the edges! Take a neutral tint and start painting negative space on the bottom snowmen – this time gently touching the edges.
The most important part of this step: LET DRY COMPLETELY! Don’t hurry through this and onto the next step. It’s better to allow the piece to naturally dry, but we live in a busy world, so if you must, feel free to use a hairdryer to dry the piece.
Once the bottom snowmen are dry, repeat the step on the middle and top snowmen, letting each row dry before starting the next.

Another way to practice is by drawing simple triangles to make pine trees.

Pro tip: Draw the first shape of the tree as a long triangle and then add branches.

The third way to practice is by drawing a moon and stars! When you draw some stars, let some of them overlap under the moon and other stars. It’ll make the piece look great when you paint the negative space!
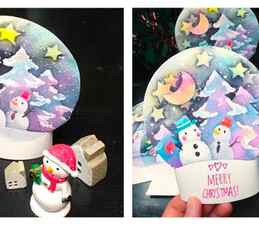
Paper Snow Globe Craft: Easy and Mess Free


Create a beautiful, paper snow globe art project that is also mess-free! This project is the perfect way to welcome the winter season. With sparkly gel crayons, glitter glue and pearly paints this snow globe project will bring a bit of winter wonderland magic into your home! When you’re finished, you can display your snow globe on a bookshelf or add a little hanger on the back to hang it on the wall. Read below for the full tutorial and learn to make your own paper snow globe art.
What You’ll Need to Create Your Paper Snow Globe
- Cardboard
- Hot glue gun
- Chroma Blends Circular Watercolor Paper
- Lil Watercolor Paint Pods
- Rainbow Sparkle Watercolor Gel Crayons
- Lil Paintbrush Set
- Lil Poster Paint Pods
- The Ink Works Markers
- Mini Dots Pixie Paste Glitter Glue Set
- Dot-A-Lot Pearlescent Craft Paint Set
- Chunkies Paint Sticks
- Scissors

First, open your Chroma Blends Circular Watercolor Paper and remove one piece. Using a paintbrush and some water, splotch different colors of blue and purple watercolor paints onto the paper. I love the variety of different colors in the Lil Watercolor Paint Pods set and used several shades of blue and purple!
Before blending your watercolor paints, use the Rainbow Sparkle Watercolor Gel Crayons to color over your watercolor paint. I used the light purple color. These will blend with your watercolor paints and add some sparkle to your artwork.

Use a wet paintbrush to blend all of the colors together on your watercolor paper and allow it to dry.

Once your watercolor has dried completely, use the white paint from your Lil Poster Paint Pods set to begin to paint the scene inside your snow globe. Then I painted a snowy ground along the bottom of the circle and added a snowman! You may need to add multiple coats of white paint to get a solid look. Now allow your paint to dry between coats.

Next, use one of the black markers from The Ink Works Markers set to draw some evergreen trees on either side of your snowman.

Use the green paint from your Poster Paint Pods to paint your trees green! You will still be able to see the marker lines through the paint which will help your trees to stand out against the blue and purple background. Let all of your paint dry completely before moving on to the next step.

Once your paint is dry you can add the finishing touches to your snow globe scene! First, I used the Ink Works markers to add eyes, a mouth, buttons, and arms to my snowman. Next, I used the blue glitter from the Mini Dots Pixie Paste Glitter Glue Set to add some sparkle to the trees! You use a paintbrush to apply this glitter – it’s one of my favorite OOLY products! Finally, use the Dot-A-Lot Pearlescent Craft Paint Set to add the final pieces. I used the gold paint to give the snowman a nose and add stars to the tops of the trees. Then, use the white paint to add snow all around your snow globe scene! All you need is a gentle squeeze with these paints and they dry and remain dimensional on your artwork.

How to Make the Cardboard Background
Next, we will use the cardboard to create the remainder of your snow globe. Then use your Chunkies Paint Sticks to paint a large square of cardboard white. Make sure this square is larger than your watercolor paper! Next, cut a trapezoid cardboard shape for the bottom of your snow globe. I used the purple paint stick to paint this part, but you can use any color you like. Chunkies dry in just a couple of minutes so you can move onto the final step once your other paint is all dry.

Once all of your paint has dried, you can assemble your snow globe art! I used a hot glue gun to attach all of the pieces. Make sure you have an adult help you use hot glue! First, glue the snow globe scene on the watercolor paper onto the large white square. Then use scissors to cut the cardboard into a circle leaving about a 1” border around the edge of your watercolor paper. Now, glue the top of the cardboard trapezoid to the bottom of the circle. Finally, attach the top of the trapezoid to the back of the circle. Lastly, your snow globe is now complete!

This guest post was written by Emily Limer, a mom of three and preschool teacher from North Carolina. You can follow her on Instagram @makingwithmommy for more kids craft activities.


