Comments are closed.
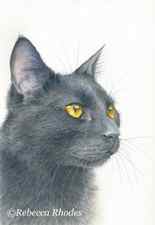
How to Paint a Black Cat in Watercolor
You can view a taster video on my Youtube channel.
This tutorial is available with the monthly subscription, or as a single course.
Here’s the Process:
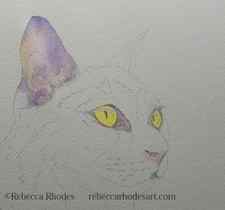
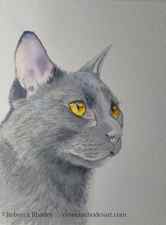
Step 1: Establish the main features – the eyes, ears, nose, and some of the mouth.
- Use a watery grey mix of blue and brown, to outline the main features of the eyes, nose, and mouth, creating a map that can be followed in future applications.
- Continue with the under painting – the lightest color that can be seen in the head and neck, starting with the yellow of the eye, and then pale, watery pink in parts of the nose and corners of the eyes.
- The ear is a mix of pink, blue, purple, yellow, and some grey.
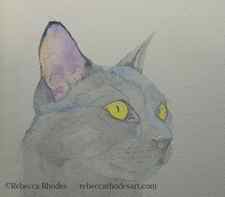
Step 2: Under Painting
- Move to the under painting in the head and neck, first a pale blue, and then grey.
- This is the lightest color that can be seen underneath the fur.
- During this process, I’m planning ahead, mapping shapes to use as a guide in future applications.
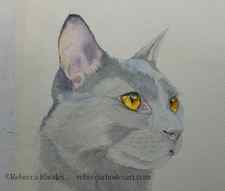
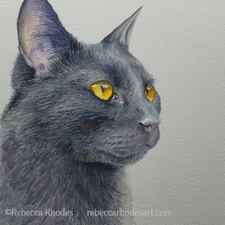
Step 3: Refine the Eye, Darkest Shapes
- Next, I’ll revisit the eye with deeper yellow. View the eye tutorial free of charge!
- You can see step by step photos of the eye in my previous blog post.
- As the eye dries, I’ll lay out the darkest shapes in the head and neck using a watery grey.
- Further refine the eye with brown and black.
Step 4: Deepen Darks, Map Shapes
- Continue to deepen the darkest parts and map shapes, applying the beginnings of fur markings and textures.
- This is a watery to milky consistency.
- Create the little whisker markings in the cheek.
- Little by little, shapes are connected and values deepened.

Step 5: Fur Markings, Deepen Darks, Refine Ear
- Apply rough fur markings everywhere.
- Once again, deepen the darkest parts.
- Further refine the colors of the ear.
- Apply fur markings around the ear, followed by the longer hairs.
Step 6: Finer Hair Markings, Deepen Values, Smooth Textures
- Deepen the mid-tones, creating depth and contour, along with smoother transitions from black to grey.
- Apply finer, more detailed fur markings, being aware of the length and contour of the hairs.
- Deepen values and adjust texture and shapes so there’s a smooth transition from dark to mid-tone to light values.
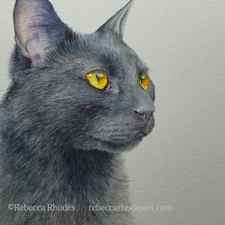
Step 7: Smooth Textures
- Apply plain water over all black areas and the ear, to smooth the textures just a bit.
- When this has dried, reinforce areas that need to go darker in value or need additional texture.
Step 8: Final Steps
- Make final enhancements to the eye.
- Reinforce the deepest blacks, create fine hairs and whiskers.
- And this cat is finished.
I hope you can use these techniques in your own paintings, and feel free to comment if you have questions.
Thanks for visiting!
BLACK CAT PAINTING SUPPLIES
- 11″x14″ Canvas Paper or 11″x14″ pre-gessoed canvas
- Tracing paper (for transferring stencil)
- Charcoal pencil (for transferring stencil)
- Palette, palette paper or plate for mixing paint
Brushes
- ¾” Flat Wash Brush
- #10 Flat Shader
- #10 Filbert Brush
- #0 Detail Round
Paints
- Mars Black Acrylic Paint
- Crimson Red
- Mid Yellow
- Ultramarine Blue
- Titanium White Acrylic Paint
BLACK CAT PAINTING STEPS
Follow these step-by-step instructions on how to paint your very own cute black cat wearing a witch hat.
STEP 1: With a flat wash brush loaded with red, begin blocking in the sides of the entire canvas, leaving the center area of the canvas white. I made sure to make my brush strokes go in an arc/circular direction around the center of the canvas.
Next, load a little bit of your blue onto your brush and lightly brush over various areas of the previous red layers, using the same circular brush strokes. Make sure to do a little bit of paint at a time to keep the red showing through underneath.
Then, with your rinsed flat wash brush, mix together white and red together to make a lighter crimson/pink. Using the tip of your brush, lightly brush the color over various areas of the painted areas- making sure to follow the same circular brush stroke as you do so.
I tried a reverse coloring
Please enable JavaScript


