Use the darker sand color on the upper half of this section and the lighter on the bottom. Paint both colors in using the same long horizontal lines used in the rest of this easy ocean art. Then repeat the blending process where the colors meet.
Cute and Easy Ocean Art for Kids
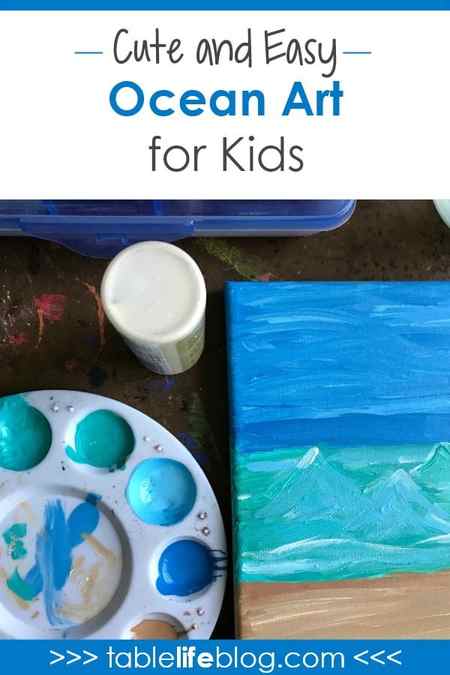
Looking for a beach-inspired art project to enjoy with your kiddos this summer? Good news: I’ve got you covered with this super easy ocean art tutorial and the best part is that it’s perfect for kids!
*Post contains affiliate links; see disclosure for details.*
What I love about this beach-inspired tutorial is that it’s really forgiving and it only requires a few supplies to make it happen. Those two things make it the perfect ocean art project for kids!
Easy Ocean Art for Kids
Here are the supplies you’ll need to gather for your kids:
- canvas panels or stretched canvas
- assorted acrylic craft paints (look for white and a couple of blues, aqua greens, and browns)
- paintbrushes
- white paint pen (optional)
- pencil
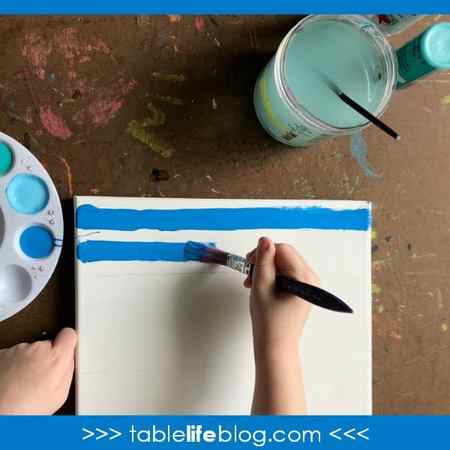
Step 1 – Blue Skies
Once you have all of your supplies, lightly draw two lines on the canvas to create dividing lines for the sky, water, and sand. Then start painting the sky by choosing one of your blues and painting some horizontal lines across the canvas.
Depending on your canvas and paintbrush size, you may create several of these lines or just a couple. Either way, be mindful of that first dividing line as you paint your sky.
Next, fill in the white spaces in the top section with the other blue using the same horizontal strokes.
When the top section of the canvas is covered with the blue tones, go back and use a light swooping stroke — still horizontal — to blend the lines where the blues meet or to add some extra color to the sky.
This blending is why this easy ocean art is particularly forgiving. It makes up for any wonky lines that happen and adds interest to the sky. Better yet, as long as the strokes stay horizontal, there’s not much that can go wrong here.
Simple Ocean Drawing Tutorial (Easy Pencil Seascape Sketch)
Check out this simple ocean drawing tutorial (easy pencil seascape sketch) in this beginning art lesson. Drawing ocean waves can be easy with a few simple steps.
Creating a beautiful and realistic ocean scene in pencil can be very satisfying and relaxing. Follow along with my step-by-step video art class to learn how to draw the sea.

Jump to:
- Materials
- Video
- Transcript
- Art Lesson Overview
- Variations
- Tips and tricks
- Detailed Instructions
- For More Practice
- What to do with your sketch
- Frequently Asked Questions
- You also might like
Materials
- Pencil – 8B or other soft, dark pencil
- Paper – 70 pound / 115 gsm. drawing paper 6 x 9 inches (or use whatever you have on hand)
- White vinyl eraser
- Chip brush to brush off eraser dust
- Blending stump (or could use a finger, rolled-up tissue or a Q-tip)


- Draw a border around the edge of the paper. Don’t worry if the lines are not very straight. It can help to keep your wrist straight and use your whole arm when drawing.
- Draw the tops and bottoms of the different layers of waves.
- Shade in the area between the horizon line and the top of the wave.
- Leave the large wave white for now. Below the wave, add some areas of shading. Draw in irregular strips of shading, wrapping some of them around in wave or circular patterns. Leave some areas white where light is reflecting off the water.
- Draw broken and irregular lines along the edges where the waves meet land. Out with a gradual transition, leaving some white area before the last wave.
- Shade in the sand.
- Add some nice loose lines in the wave to indicate the direction that the water is going and some lights and darks. Use scumbling or “scribble hatching” on the top of the wave to indicate texture.
- Use a blending stump (or tissue, q-tip, or finger) to blend the dark area at the top just below the horizon.
- Drag a finger through that shading then drag it in the sky towards the top of the paper. The sky is always lighter at the horizon line.
- Blend the lines in the middle area under the wave to soften the darks. Also, blend the two waves that touch the shore to create a smooth transition between the darks and lights.
- Use an eraser to brighten up any areas that you want highlighted and clean up the edges of the drawing. Use a chip brush, if you like, to brush away the eraser dust.
Variations

- Draw the oceanscape with colored pencils.
- Sketch a boat or a people swimming within the seascape.
- Brush some watercolor paint into the drawing to add some color to your sketch.
- Try adding some color to the waves with soft pastels.
- Use a blending stick for more detailed blending (but you could also use a finger, rolled-up tissue, or a Q-tip).
- Follow this tutorial or refer to photos of the ocean until you have solidly learned the structure of waves and how to draw them.
- Make sure to leave some white areas where the top of the wave is and where light is reflecting off the water.
- When adding shading to the sky, remember that the sky is darker higher up and lighter at the horizon.


