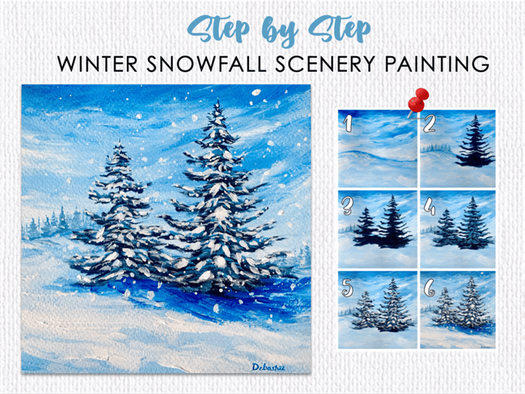
Winter is here. So no wonder you are looking for some easy winter landscape paintings…
Snowy Acrylic Pine Tree With A Round Brush
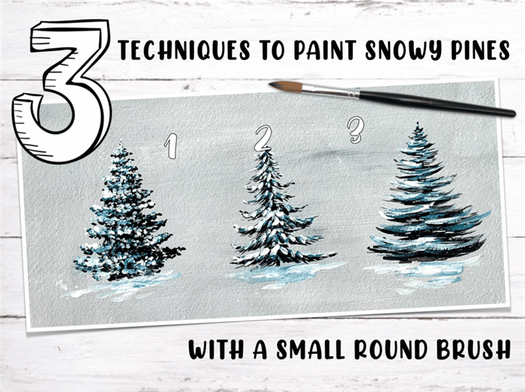
If you like painting on a small surface, then probably learning to paint the snowy pine trees with the round brush is the best learning! Once you understand these 3 techniques, you will be able to create any delicate snowy acrylic winter pine tree in any landscape painting with a round brush!
This blog will cover 3 basic techniques of painting snowy acrylic pine trees with a small round brush. If you want to paint big snowy pine trees in your landscape, check out this article on how to paint snowy pine trees with a flat brush, filbert brush and a fan brush!
Materials needed:
Brush – Size 2 from my favorite miniature brush set
Colors – Black, White, Prussian Blue & Cadmium Yellow
Surface – A4 Acrylic paper
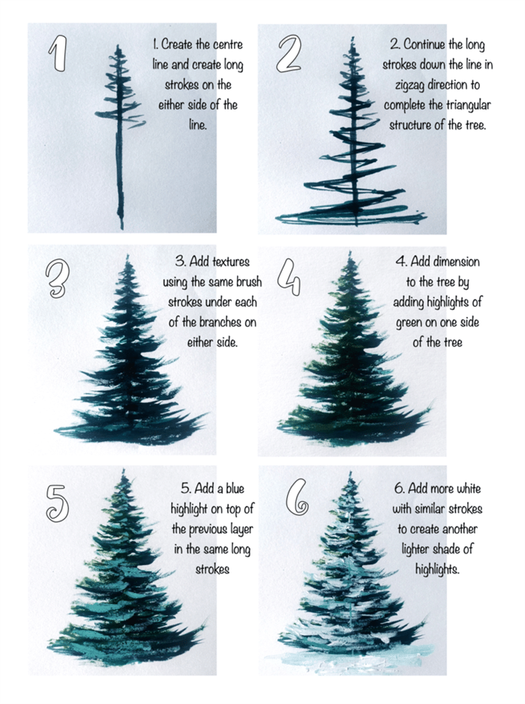
Before learning the 3 techniques of painting snow pine tree with a round brush, check out my blog on the basic structure of a snow pine tree, which will give you a clear idea on the 6 easy steps of painting a snow pine tree.
* If you need to watch the process of creating these 3 techniques of painting snowy pine trees, I’ve a video at the end of this blog post.
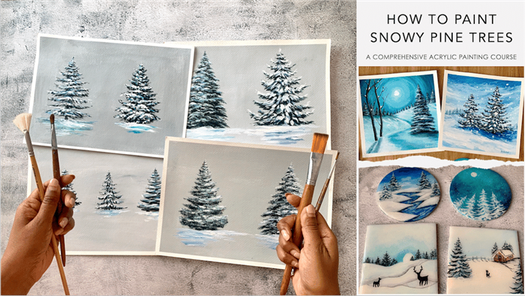
PS. I’ve taught these trees in detail in the class – How to paint snowy pine trees. So in case you wana learn first hand from me, join me in this class, covering 9.5 hours of instruction and inspiration!

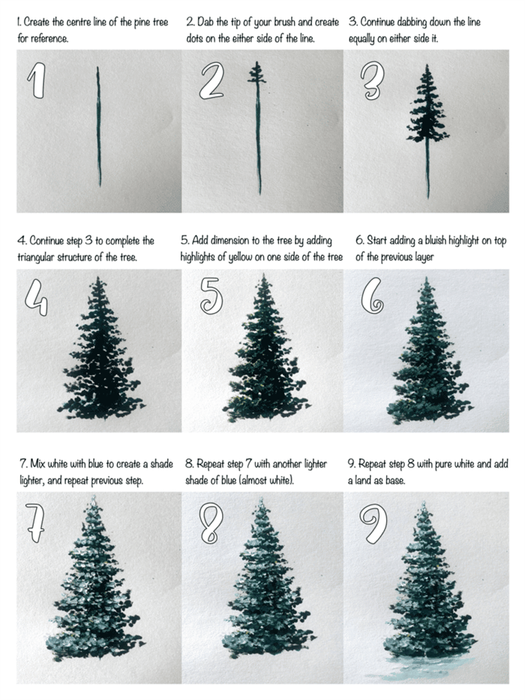
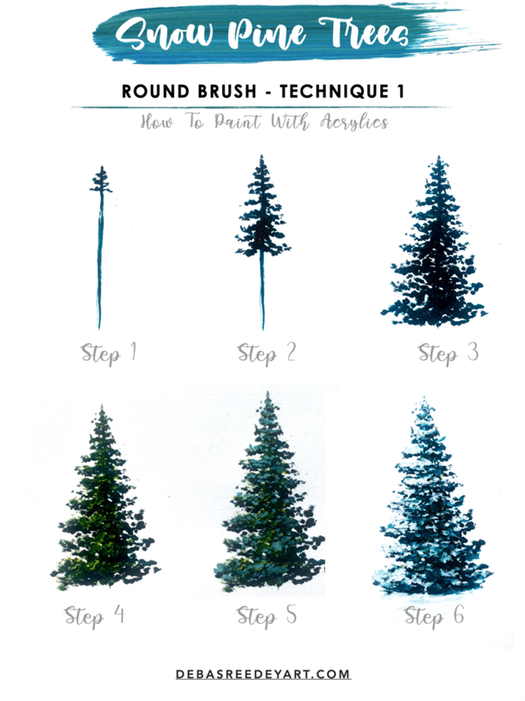
technique 1 – Dots
In technique number 1, we are going to create small dots by dabbing the tip of our small round brush repeatedly multiple times on the canvas.
It is almost like stippling.
We will move the brush either in zigzag motion or move equally on either side of the centre line, depending on the structure of the pine tree.
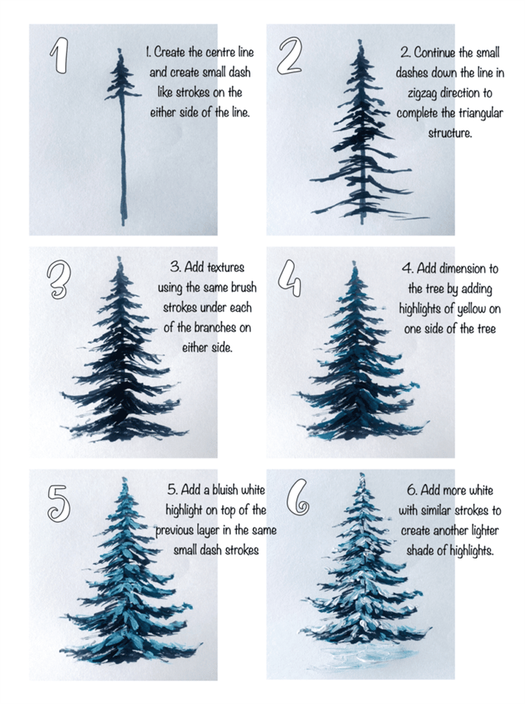
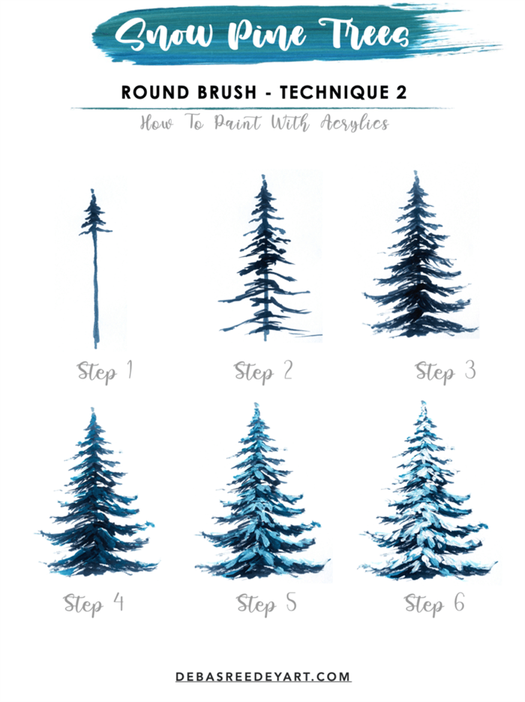
technique 2 – Dashes
In technique number 2, we are going to create small dash like strokes by dragging the tip of our small round brush. Multiple such small strokes gathered together will create the texture of the tree.
We will move the brush either in zigzag motion or move equally on either side of the centre line, depending on the structure of the pine tree.
Here I’ve reduced the number of steps to 6, because the last 3-4 steps are just repetition of the highlight layer with different shades of blue. You can create as many layers as you like – more the layers, better your tree will look.
Painted Forest Mural
Information and timelapse video on the pine tree painted forest mural from our cottage. This basement bedroom project took less than 2 hours!
I have a fun project to share today (with a video). It’s something I completed in a couple of hours (over two weekends) at the cottage: a painted forest mural! Actually, it’s a pine tree mural rather than a full forest, but we’ll just ignore that technicality 🙂


We had the walls painted dark in the basement at the cottage. I wanted it to be moody and cavernous – and it’s a fun contrast to the off-white walls upstairs.

For each of the bedrooms, I wanted to do a nature-theme (you can see the moodboards here). Although we have been renting/using the cottage the last few months, I finally got around to starting some of the murals.
First up, the forest room. Complete with green bedding and a green rug (plus the green crib that’s out of the view).

Last weekend I mixed some painting using our two main wall colours (the off-white and the dark taupe). I could have used the trim colour (a medium tone, called Brandon Beige) but I didn’t have a lot left and didn’t want to run out. Plus it’s slightly glossier, and I wanted it all to match.

I taped the areas on the walls where the nightstands, bed and headboard went to. Then, got to work painting tree trunks and branches. I should have put more branches to begin with (I added more afterwards) but I didn’t know how full the leaves would be at first.
Painting Tree Leaves

For my ‘leaves’, I picked up three sample pots of green paint, and tested a couple techniques on a piece of paper.


Essentially, I dabbed on the darker colour on the bottom section of the branches, then filled in with the medium colour to take up most of the space, and then a lighter colour on top to highlight certain sections.
You can watch it all in the YouTube video here (or scroll below to see it embedded).

Here’s a photo that shows where I added more branches. I had a lot of good side pieces, but trees are three-dimensional in real life. The small pieces were supposed to be where it was coming towards me. (I did have to mix more of the beige paint, so it’s slightly lighter here.
Painted Forest Mural Results


I also filled in some sections where I could see too much branches/trunk. And the two photos above show what it looks like now!

The two lighter greens were most similar to each other, one just had a slightly more yellow-hue. I tried to dab the paint on as best as I could with a round brush to make round imprints. There were some areas that I used more paint, and some spaces where I wanted just a ‘kiss’ of colour.
There was a lot of glare from the overhead light in the photos, and the one above it what it looks like with just the light from the window.
If you cannot see the video player above, you can watch it on YouTube here. Essentially it’s a timelapse of me painting it (I think it was one hour of footage condensed to 2+ minutes). I painted the trunks two weeks ago, then bought the paint and did the leaves this past weekend.
It really does feel like the forest room now!
There is a bit of paint that I got on the ceiling and other wall, but I think I’ll do a touch-up on all the areas when I’m done the rest of my murals. (I started the second one already).

Like I mentioned, the painted forest mural took just a couple of hours to complete, and I think it’s really fun! While I wanted all the murals to be on the headboard wall (like these pine trees), the other ones will actually be somewhere else. I’m halfway through the next one (flowers), and have two more to go (rainbow and water).


