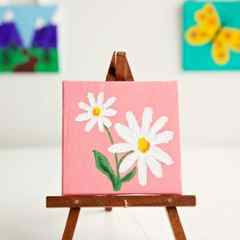
I got myself a little 2×2″ mini canvas pack at a craft store years ago. I thought they would be so neat to make tiny paintings of, and they really were a LOT of fun to do! In fact, probably the most fun I’ve had doing a painting, because they don’t take long being so small, you can try out so many different things and not waste a lot of time or a big canvas!
Tiny Canvas Painting Ideas Video

Miniatures are so intriguing. Tiny Canvas Painting Ideas are no exception. I mean, who doesn’t love miniatures? I’m hoping that our grands enjoy this project when we try it when the next time they are here.
Well until then, let’s try it ourselves!
Here’s the Painting Tiny Canvases Video if you prefer

The miniature canvases are found in many discount craft sections. I got mine in a craft store but have seen them in many discount stores.
I picked up a couple packages on sale the other day. That is what spurred this post! I couldn’t pass them up and knew they would be fun for us to try with the grands.

Choose your design
Even though the canvases are tiny, it is still a good idea to draw a design idea or find a picture you will use for your design inspiration.
On a piece of paper, trace around the canvas so the size of your drawing is correct. This is helpful in testing to see if your idea will work well in miniature.

Simple Mini Canvas Painting ideas


One of the most common yet interesting mini canvas painting ideas is mandala art. If the name mandala makes you think it is an extremely difficult form of painting, then relax; mandala is easy. All you need are the right dotting tools, and you can get the most attractive mandala paint ready in very little time.
Geometrical Pattern

If you are not an ace painter, then you would probably love to go geometrical for your painting. Yes, geometrical patterns such as circles, triangles, squares etc. look pretty professional, and they add that much needed distinctness to a painting. Did you try beginner level abstract painting ideas? Now it is time to move on to the next level of the abstract painting art.
Paint Some Fruits

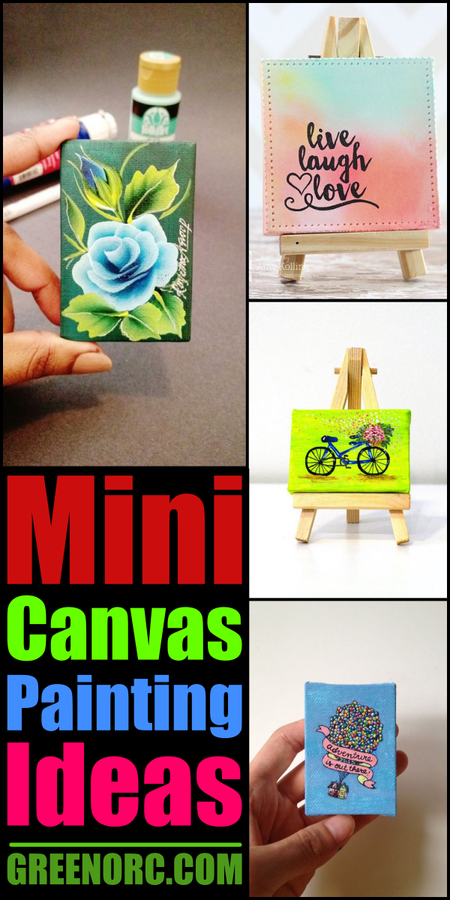
If you have seen slices of watermelons, lemons and pineapple painting on small-sized canvases, then you probably know how popular Mini Canvas painting ideas they are. And because they are popular, you can give them a try.
Step 1 – Reference & Preparation
Get a photo of what you want to paint. Keep in mind the proportions of your canvas in relation to your photo. You might not be able to fit everything in the photo onto the canvas. The canvases I used are square(and most mini canvases are). Most photos are rectangles, so if you want, you can digitally crop your photo to help you visualize what you’re going to paint better, or you can cover up a part of the photo if you’re using a physical copy. Whatever works to help you out, it’s just something you have to keep in mind!
Take a little black paint and dip your brush in water to lighten it up. You may drag your brush on the paper towel just to make sure it’s not too dark, or you don’t have too much water on your brush.
Lightly apply the paint on the canvas and “draw” or outline the major parts to your painting. This will help you get in place all the important details and where you want them. If you mess up, don’t worry-before the paint dries you can take the paper towel and wipe it off. You can also dampen the paper towel with some water and wipe it off that way too.
Step 3 – Color Blocking
Once you’ve got your outlines in place, take a close look at the colors in the background of your image. In the one I was working on I knew there were browns up top, a large plot of green grass on the right, and darker greens on the left. The bridge has greys and blacks. I like to work in “layers” going from background to foreground. Creating this background layer will give you a good solid base to build the mid and foreground objects on.
Start mixing your paint colors* to get those shades you saw and apply them in large areas to create the background colors on your image. This step can be messy, but that’s ok! I mean, just look at the steps to my painting, before the end it looks like the forest is on fire! Just get those basic colors in, and don’t worry if they get mixed up with each other a little-it’s better to not have completely solid colors on the image(unless they really are that way!).
*Mixing colors is a big topic, and I’ll cover that in another tutorial in the future. If you’re uncomfortable with doing that right now, you can get a basic paint set with many colors and just use them as they are, or mix them a little bit without getting too complicated.
Step 4 – Adding Layers & Details
After that it’s all about adding layers of colors on top of your background paint! You can let the paint dry in between steps if it’s easier-or if you want it to blend and mix then apply it while it’s wet. You’ll use a variety of brush strokes: small light dabs with thicker paint for leaves, make the tip of the brush sharp for tree trunks and branches, or make heavier dabs with the whole brush to do large areas of grass, etc.
Try thinning the paint if you want to put a light wash of highlight on an object-such as the white paint I put on top of the rocks. That paint was thinned quite a bit just to make the rocks pop out a bit more, as opposed to the very opaque-not watered down white in the water, or highlights on the bridge.
Play around, experiment-the only way you’re going to see and know what works is just to do it! Don’t be afraid or worry about messing up, these are small cheap canvas, you can start another one if you really want, or wait till the paint dries(or wipe off if you can), and paint over top of it.
These make great practice paintings!

*Also keep in mind, you do not have to make your painting look exactly like the photograph. None of my paintings are exact, as that wasn’t the point. These were just inspired by the photos I took, and I followed the photos as a guideline. This of course all depends on what you’re end goal is for your painting.


