2. Use a thin washi tape to tape off sections on your flower pot. Make sure to press the tape down so the paint will not leak underneath. If you are using a larger size pot, you can use a thicker tape.
How to Paint Flowers With Watercolors – Easy Beginner Guide
Dylla is the art lead on Homesthetics, the artist that through a simple sketch, technical drawing or watercolor painting makes the world a better place. Pastels, watercolors, oil paints and digital art are what Dylla breathes, on the website through wonderful sketches and paintings she tests everything from paper, pencils and brushes to styluses.
Expertises: Art, Pastel, Brush, Drawing, Pencil
Updated on June 5, 2023
I’ll be honest with you – I absolutely love flowers! Everything about them exudes elegance, which is why I find them mesmerizing to look at.
Whenever I come across new flowers during my travels, I take a moment to appreciate their beauty. Their vibrant colors and intriguing shapes never fail to amaze me. That’s why I have decided to capture their charm on paper with my brush.
Hey guys, today, I’ll be drawing seven simple yet beautiful flowers with watercolor. I have specifically chosen this coloring medium because of its versatility, which will allow me to reproduce the vivid beauty of these flowers in great detail.
Also, the stepwise guide that I have provided is simple enough to be followed by experts and beginners alike. So, if you love flowers like me and want to create floral artwork for your gallery wall, then read on!
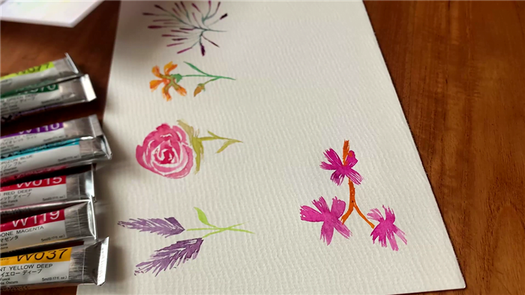
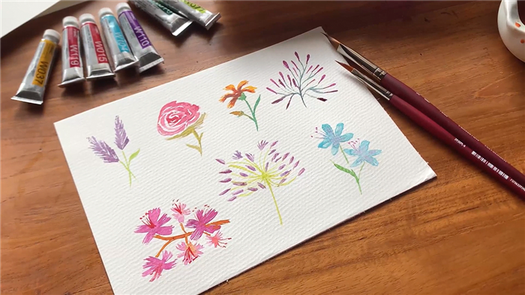
Painting Simple Flowers In Watercolor
The first thing you need to do is gather the equipment and supplies. Below, you will find a list of all the items that I have used for this painting.
Paint: Holbein | Paper: Baohong Watercolor Paper 300 gsm | Brush: Princeton Velvetouch Triangle 3950 Brush – Petals
Naturally, you can use the products that I have mentioned here for similar results. But if you don’t have them, then no worries – any watercolor tube or pan, paper, and brush works. You can use your own equipment and supplies as long as you are comfortable with them and they are of decent quality, any type of watercolor paper will do, and there are even a lot of watercolor paper alternatives that you can use! If you are wondering how to use watercolor paints in tubes this guide will help you out in jiffy!
As for the colors, it’s quite natural to think that a full set is necessary here. You will be painting flowers, after all, and the best way to capture their vibrance is to use as many colors as possible.
Luckily for you, the flowers I have chosen can be painted easily with only a few colors, namely – red, orange, purple, blue, and pink. Of course, I have used a couple more colors, like brown, green, and yellow, for the leafy parts, but that’s about it.
Anyway, now that the supplies and equipment are taken care of, it is finally time to start painting!
Step 1 – Painting A Lavender
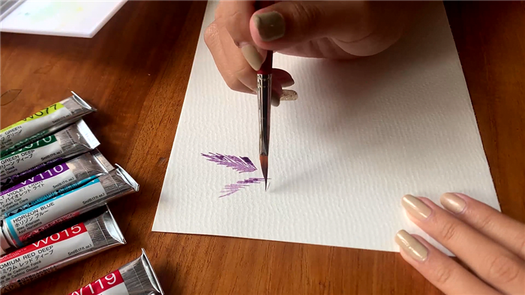
The first flower that I will be painting today is the lovely lavender. To get started, dip your slightly wet brush into some rich purple paint, and begin painting the flower with short, controlled strokes. Make sure to use the tip of your fine brush to paint the intricate petals.
Needless to say, you have to have good control over your strokes here, or else the drawing will be ruined right at the start. You wouldn’t want that to happen now, right?
Once you have completed the first flower, you need to repeat the above process to create more. Of course, the number of flowers you want to paint is entirely up to you. As you can see, I have made two lavenders, but you can stop at one or make more than two.
Step 2 – Painting The Body Of The Lavender
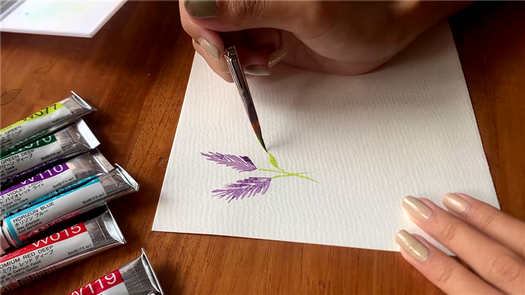
After you are done painting the lavenders, you will need to paint their bodies. When I say body, I am referring to the slender flower stalk. Therefore, the more flowers you draw, the more bodies you will need to make. Thankfully, it is not a very complicated step, so there’s no need to worry.
For this purpose, I suggest that you use the same fine brush as before. Dip this brush in green paint and draw the stalks with a long and gentle stroke. If you want, you can add a few green leaves here and there, as I have done. But try not to overdo it because the leaves are not the primary focus here.
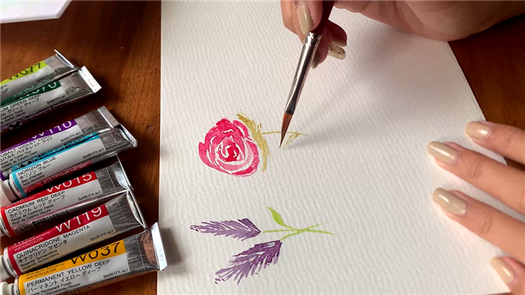
Step 3 – Painting A Rose
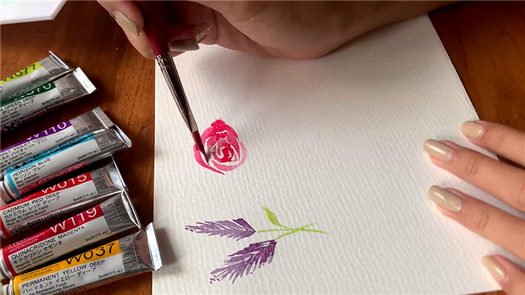
How can a drawing of flowers be complete without the iconic rose? That is why I have drawn a gorgeous red rose in this step. Naturally, the structure of a rose is a bit complicated to draw, but if you follow what I have done, you won’t have any trouble with it.
Dip the wet brush into the red paint and paint the center of the flower first. Then, you can gradually move outwards by painting the subsequent layer of petals one by one. You need to be very careful here; otherwise, you will end up with a smudgy, indecipherable mess. So, there’s no need to rush – take your sweet time painting the flower!
It is important to keep the brush adequately wet throughout this step, for that will make it easier to define the edges of each petal. Besides, it will help capture the beautiful watercolor finish.
Step 4 – Painting The Rose Stalk
Same as before, you need to paint the stalk of the rose to give it a complete look. You’ll notice that I have used green paint with a slight yellow tinge here. It has given the flower stalk a slightly withered feel.
But that’s just how I like it, which means that you are free to experiment with your own color combinations. Or, if you like to keep it simple, you could use the same green color as the last flower to paint this part.
Draw the stalk in such a way that it does not overlap with the petals. Likewise, add a few leaves to make the flower look more realistic. After you are done, let the color set for a while. You have to admit – the rose looks charming, doesn’t it?
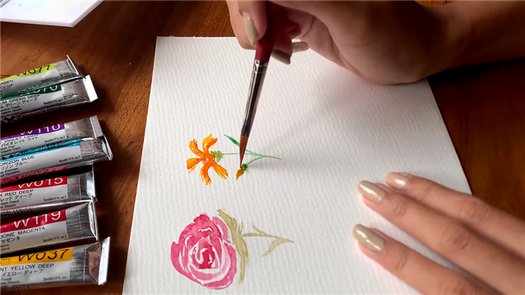
Step 5 – Painting A Calendula
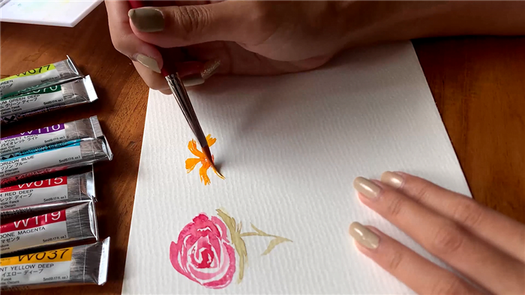
Now, it is time to move on to the next flower of this art piece, which is the Calendula. In order to paint this flower, I have used a similar approach to the rose. I drew the central part first, and then I moved on to paint the outer petals.
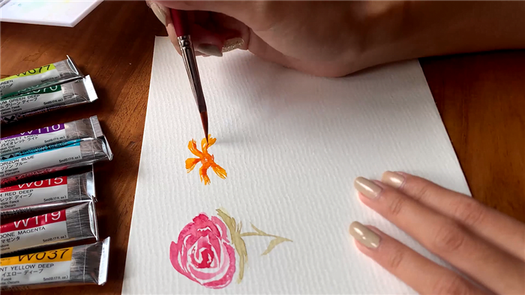
So, dip the brush in the orange paint, and start painting the flower. The petals of a Calendula flower project outwards from the center in a radial manner. Thus, you need to keep this in mind while painting the petals.
On that note, I have used the tip of my fine brush and a slightly darker shade of orange to create textures on every individual petal. I would suggest that you do this, too, for it gives depth to the painting and gives the flower a unique three-dimensional look.
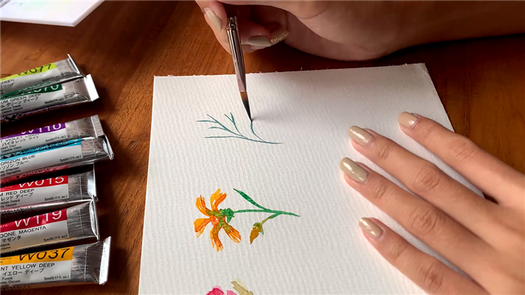
Step 6 – Adding Some Extra Components To The Flower
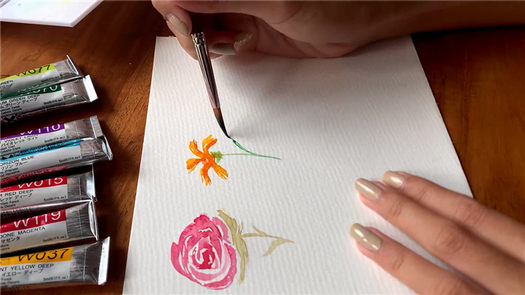
After finishing the main flower, you will need to add some extra elements to make the drawing come to life!
First off, I have added the stem with a single leaf below the flower. While I have used a light green shade for the stem, I have painted the leaf with a slightly darker shade of green. Obviously, you can use the same colors as I have or play around with a different combination. You can add a couple more leaves to the stem for good measure.
Following that, I added a small flower bud on the left of the primary flower to make the painting look more appealing. Here, you should try to keep the secondary flower bud small enough so that it can complement the main flower. Also, I suggest using a darker orange shade to paint it.
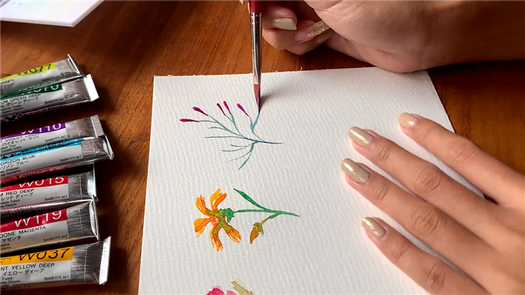
Step 7 – Painting The Stems For Berry Flowers
Now, I will paint berry flowers, which are incredibly simple to create. Nevertheless, they are quite beautiful, which is why I think you will like them!
Up until this point, I have drawn the flowers first, and then I have painted the stems. But in this case, I have used the opposite approach – I painted the stems first and then the flowers. So, dip the brush in green paint and get started.
When painting the stem, you are free to create as many branches as you wish. Just make sure to leave some space in between so that you can add the flowers.
I recommend using a fine brush and dark green paint for this step. The former will be especially helpful if you are planning to make a lot of branches. Try to use sweeping strokes, as that will allow you to paint cleanly without making any mess.
Step 8 – Adding The Berry Flowers To The Stems
Once you are finished painting the branches, you will need to add the flowers to them. You don’t need to create any intricate details as I have done for the previous options. Simply press the tip of your brush against each stem, and you’ll be done!
Dip the brush in a rich purple shade and paint the flowers on each individual stem gently. Ensure that the brush is properly aligned with the end of each stem. After all, you don’t want the flowers to look dislocated from the stem, right?
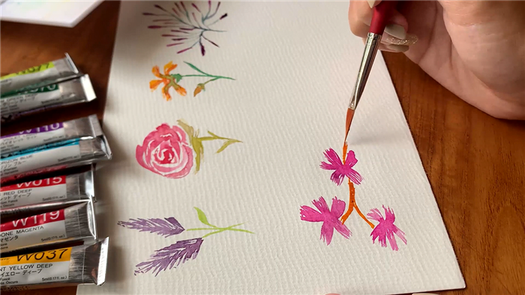
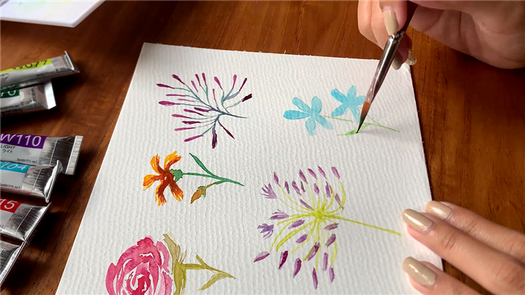
Step 9 – Start Painting Sakura Flowers
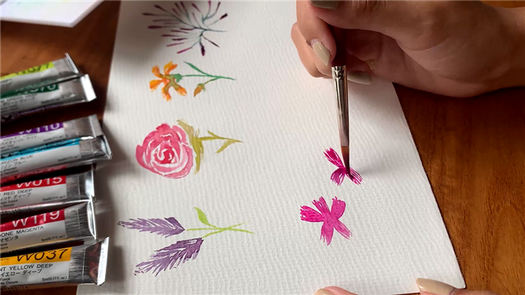
Next up, I painted the Sakura flower, which is another simple but captivating flower. You can start by painting the petals of this flower using a fine brush and a pink or red shade. Dip the brush in the chosen color and softly apply it on the paper with the fine tip.
After you have painted five petals, your first flower will be complete. Then, you need to repeat the process a few more times to paint multiple flowers. You don’t need to make all the flowers of the same size, though.
Note that I painted three flowers initially and added a few more later. You can do the same, or you can create more (or fewer) flowers. When you are done, you need to let the paint set for a little while before proceeding further.
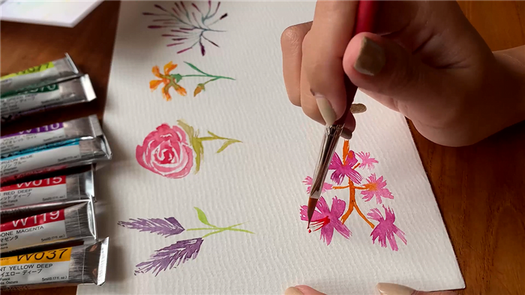
Step 10 – Adding The Branches And The Anthers
Now that they are dry, it’s time to decorate the flowers! For this step, I have added a small, petite branch to connect all of the flowers together. I used a fine, wet brush dipped in brown color to draw the branch. You need to use gentle, controlled strokes so that you don’t smudge the flowers.
Then, using the same technique, I drew four to five anthers on each individual flower. Try not to make them too thick, or they will ruin the painting. You can also add some fine dots at the tip of each anther, like I have done, to make it look unique.
Step 11 – Painting The Stem Of Agapanthus Flowers
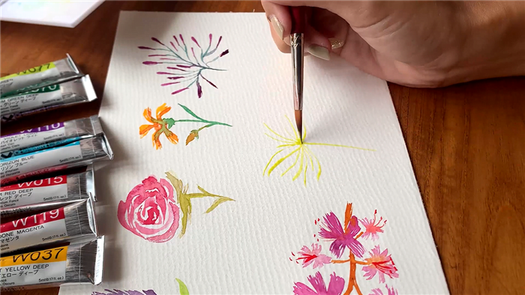
For the sixth flower of this artwork, I have chosen the Agapanthus. The method for painting this one is almost the same as the berry flowers, as I have painted the stems first and then the flowers.
However, the stem structure is a bit different, as you will see in this step. To begin, dip the brush in a yellowish shade, and paint a long and slender stalk in a single stroke. Then, using the same technique, draw several radial branches around the top end of the stalk to create a brush-like volume.
Step 12 – Drawing The Agapanthus Flowers On The Stems
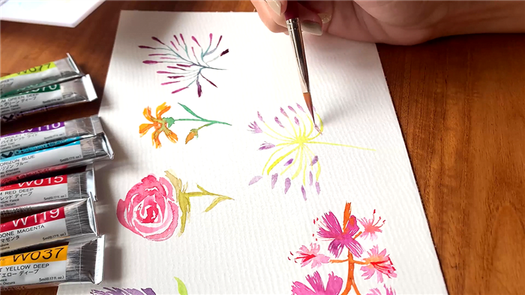
Dip the brush in purple paint and start adding the flowers. For the best results, you should use the tip of the brush and make short strokes. Draw a flower at the end of each stem first, following which, you can add a few extra flowers in the middle of each stem.
As you can see, I have created two different flower structures here for variety. Some of the flowers have a bud-like shape, and others have a shape resembling a brush.
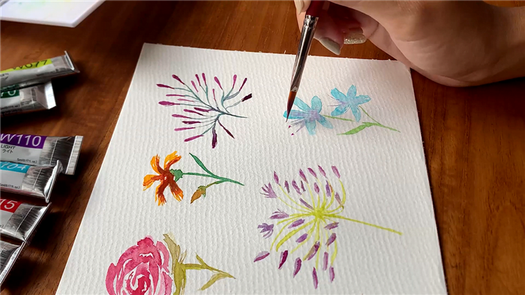
Step 13 – Painting Periwinkle Flowers
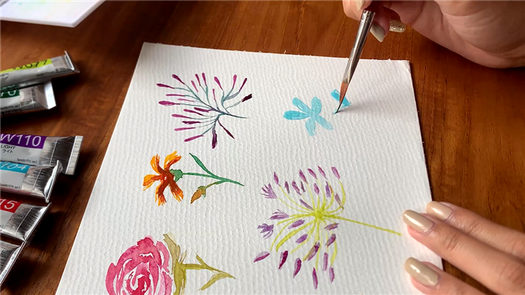
Don’t go anywhere just yet, for there is still one more flower left to paint! For the last flower of this art piece, I have chosen the lovely periwinkle. Start by painting the petals with a light blue shade. Keep the brush sufficiently wet, and paint five petals using short strokes.
After you are done, repeat the above process to paint a second flower just below the first. I have made this one on the right side, but you can paint it on the left side too.
Step 14 – Adding The Stem, Anthers, And Finishing Touches
It is time to draw the stem of the periwinkle. Using green paint, carefully paint a thin stem to connect both flowers. Like me, you can add a leaf to this stem to make it a little more attractive.
Subsequently, you can add a slight purple hue near the center of each flower to achieve distinctive multicolored shading. Allow the paint to set for a while after you’re done.
Then, you need to paint a few anthers on each flower using the tip of your brush. You can use the same purple shade to draw them.
With that, I have almost reached the end of this artwork, which means that it’s time to add the final touches. Once you are done, allow the paint to dry, and then voila – your painting is finally complete and ready to adorn your gallery wall!
Conclusion
Now you know how to create captivating floral artwork using limited supplies. So, feel free to go ahead and experiment on your own.
Sure, you might make a few mistakes at first, but don’t let that stop you. Instead, use those mistakes as learning experiences, and keep on practicing. And before you know it, you will be able to draw flowers like a pro!
In any case, that’s about it for today. Frankly speaking, I had a lot of fun with this project, and I hope that it was the same for you as well.
But if you don’t like flowers, then no worries, you can try out our watercolor forest tutorial or watercolor Amsterdam painting guide to experience watercolor in a different manner.
How to Make Painted Flower Pots with Stencils
I’ve had my fair share of Silhouette Cameo projects on the blog, and now I’m finally upgrading to the Cricut Maker.* With either machine, you can make these pretty stenciled flower pots. But what if you don’t have a cutting machine? You can still use pre-cut stencils or painter’s tape for this craft. (I’ll share a few budget-friendly stencil options at the end.) *The main reason I’m upgrading to Cricut is that I’ll be able to cut thicker materials more efficiently.

For this craft, you’ll only need a handful of supplies and a little patience waiting for the paint to dry.
Supplies for Painted Flower Pots
- Plain terracotta pots
- Clay pot sealer
- Acrylic paint (indoor/outdoor safe)
- Stencil film
- Stencil design
- Cricut or Cameo
- Painter’s tape
- Foam brushes
- Optional: pre-cut stencil (see options near the end)
If you’re looking for a painted pot craft that doesn’t require a cutting machine or stencils, be sure to visit my fingerprint flower pot tutorial. It’s the perfect craft for kids! You can also use paint pens as I did for these Halloween flower pots.
Step 1: Clean and dry the flower pots

Before beginning your project, wipe down your clay pot with a damp rag. This removes any dust or particles that may wreak havoc on your painted design.
Make sure the pot is completely dry before proceeding.
Step 2: Spray the sealer on flower pots and saucers
When painting flower pots, it’s always a good idea to use this sealer to prevent moisture from seeping through to your design.
I’ve used the same sealer when making decoupage flower pots and mosaic flower pots. I swear by it! This extra step will help your pots to hold up in the outdoors.
Allow the sealer to dry for 24 hours before beginning to paint your pots.
Step 3: Apply 2-3 coats of a base paint
Paint the flower pots with 2-3 coats of acrylic paint that is suitable for outdoor use. Most labels will indicate if the paint is multisurface and/or appropriate for terracotta.
Wait at least 1 hour, if not longer, between coats.
Pro Tip
In high humidity climates, wait longer between coats of paint to prevent sticking and peeling. If sticking occurs, you can always touch up your project.
Of course, you can skip the base coat if you want the natural terracotta color to shine through after stenciling.
Step 4: Cut stencils (Cricut or Cameo option)

For my stenciled design, I used a combination of designs from the Silhouette Design Store and my own doodles.
You can find a similar design for the tropical leaves here.
Note: I measured the rim of my terracotta pots to make the rectangular pattern for the pink and brown flower pot.
Always be sure to measure your design and make a few test cuts before cutting the stencil film.
If you don’t have a cutting machine, you might like some of the stencil options below.
Shop for Pre-Cut Stencils
Step 5: Apply stencils

When applying your stenciled shapes, you can choose to paint a traditional stencil or a reverse stencil. Either way, make sure you remove any air bubbles in the stencil film.
For the green tropical leaf pot, I used the traditional method of stenciling. For the other two pots, I painted around the stencil to reveal the underlying base coat of paint.
Confused? See the next step for the full visual.
Note: For the more delicate shapes, I used transfer tape to pick up the design and transfer it to the flower pot more easily.
Step 6: Paint inside or around stencil
Now the fun part begins! Begin painting inside or outside your stencil shapes with the color of your choice.
You can blend colors, too. Check out the stippled look of the tropical leaves below. I used two shades of green to create more texture on this little boho flower pot.

You can also apply painter’s tape to create angled edges and geometric patterns.

You’ll want to apply 2-3 coats of paint to make sure your design really pops, especially with the reverse stencil. In the above photo, you’ll see the reverse stencil with one coat of gold paint.

In most cases, three coats of paint will do the job to get enough coverage. You can see how the gold paint stands out after three layers of paint in the above photo.
Step 7: Remove stencils and touch up
After the paint dries completely, gently remove the stencils.

I think this is my favorite flower pot with its little tropical vibe! In most cases, you can easily peel the stencils off the pot. However, now and then, you might run into challenges…

As you can see above, one of the paints didn’t dry fully before I applied my stencils. This resulted in some paint peeling off when I removed the delicate stencil.
No worries if this happens to you! I did a little manual touch-up painting, and all was good again.

All you have left to do is pick your favorite plant to move into your cute painted flower pots! I chose a variety of succulents to tie my three painted flower pots together.

Pin it for later!


Materials
- Terra cotta pots (I used 3 inch pots, but you could also use a bigger size)
- Acrylic paint
- Acrylic gesso
- Mod Podge (outdoor Mod Podge if these will be used outside)
- Thin washi tape
- White medium point paint pen (optional, but great for touch-ups!)
- Rocks and fake succulents (if you are using fake plants)
- Paintbrushes
- Scissors
Instructions
- Paint your terra cotta pot with two coats of acrylic gesso, letting each coat dry in between. If you don’t have any gesso, you can use white acrylic paint.
- Use thin washi tape to tape off sections of your plant pot. You do not need to tape the top part of your pot. Press the tape down firmly to minimize the paint leaking underneath.
- Paint each section with acrylic paint. Use a small brush and paint slowly and carefully. Let this first coat dry and then paint on a second coat.
- When your paint is completely dry, carefully peel off the tape. If some of the paint has leaked through, you can use a white paint pen for touch ups. If you don’t have a paint pen, try using a small detail brush and white acrylic paint.
- Paint the top section of your plant pot with two coats of acrylic paint and let everything dry completely.
- Paint on two coats of Mod Podge to seal and protect everything. Let each coat dry completely. If you are going to be using this outside, you can use an outdoor Mod Podge.
- Fill your painted flower pot with rocks and a fake plant or try using a real succulent. If you are going to use a real plant, make sure to put a plant tray underneath to catch any water drips.
Project Type: Painting / Category: General Crafts
More projects you will love


Primary Sidebar

Hi! I’m Angela, welcome to Projects with Kids. I love creating and having fun with art and am excited to be able to share my project ideas with you!


