If you’ve got a bunch of kids (or even just a couple of kids) coming over for Thanksgiving, you might need some things to entertain them while they wait for the food to be ready. These Thanksgiving printables are great to use at the table or whenever you need something to fill a little time, and honestly adults will like some of these, too.
Paint and Sip Class: Northern Love Lights
ClassBento donates with every booking to
2 hours 10 to 33     label $55
What you’ll do
Looking for date night ideas in Melbourne that break the dinner and movie stereotype? Try a paint and sip class with your lover instead! These classes are simple and fun, with no experience necessary and beginners encouraged to attend.
You can join us for a night full of fun and enthusiasm along with great music while you gain artistic tuition from a professional artist. All painting materials are provided such as a canvas, easel, paints, brushes and an apron. Bring your favourite nibbles and drinks, we provide all glassware and bottle openers for a wonderful evening.
During this class, you will learn how to paint a pair-up painting of the Northern Lights. Each person paints one side but you will work together!
At the end of the class, you will take home your own finished artwork on a 30×40 stretched canvas, which you can hang on the wall at home alongside your lover’s.
The studio’s door opens 15 minutes before and closes 15 minutes after the starting time. Arriving later would be considered a no-show-up!
If you would like to have more time for drinking and socializing, you are more than welcome to come earlier to view the exhibitions in our gallery spaces. Please find the information regarding our current exhibitions and the gallery’s hours on our website.
Booking Policy
Notice period for a Refund
1-3 Seats: More than 72 hours
4-9 seats: More than 7 days
10+ seats: More than 21 days
Notice period for rescheduling, a $25 rebooking fee applies per seat for the workshops with similar duration and value
1-3 Seats: between 4 to 72 hours
4-9 seats: between 72 hrs and 7 days
10+ seats: 1) 15 to 21 days notice, you will receive a full voucher 2) 8 to 14 days notice (50% cancellation fee)
Considered a “No Show” with no refund or voucher issued
1-3 Seats: 4 hrs or less
4-9 seats: 72 hrs or less
10+ seats: 7 days or less
Because of the limited seating available in our studio, be aware that “no call, no shows” will be charged the full amount of the class without refund.
- If the Government requires our studios to remain closed at the time of your session, we will issue you a credit voucher valid for three years.
- Suppose the Government requires us to reduce the capacity of our studios. In that case, we will issue you a credit voucher (full value of your order) or reschedule your booking to another session of your choice (subject to availability and capacity).
Private Event
- Studio 1 can accommodate a maximum of 19 guests.
- Studio 2 can accommodate a maximum of 14 guests.
- At the same time, we can accommodate up to 33 participants in Studio1 and Studio2 with two instructors.
- Friday evenings and anytime on Saturday and Sunday, Studio1: 15 guests
- Friday evenings and anytime on Saturday and Sunday, Studio2: 10 guests
- All other times, Studio1: 10 guests
- All other times, Studio2: 8 guests
- All times, Studio1 & Studio2: 25 guests
- All times, Paint Your Pet: 10 guests
- All times, off-site: 15 guests
***An additional travel fee of $295 applies for an offsite venue (for locations within 20km of Ladder Art Space). This fee pays for our tolls, artist travel time and set-up/clean-up time at the offsite venue. We assume we can access a free car park during the workshop, as we must bring the painting materials. Please let us know if there isn’t any available car park space.
Please don’t hesitate to contact us if you need any further information.
Important Note: Rescheduling requests must be sent via email only.
Please note that our space is unfortunately not wheelchair accessible.
Add-ons available for this class
- Additional cost for Offsite* Private Events ($295)
- Extra 1-hour access for food set up* ($89)
Northern Lights Pastel Art Activity
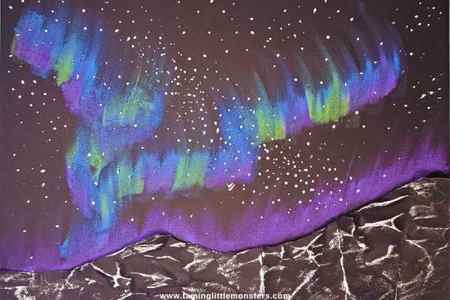
This pretty northern lights art project is a great way to talk to kids about why the northern lights happen, color mixing, using pastels and more.
If you have a set of pastels already this is a quick prep activity you can do at home or in the classroom.
Check out all the details over at Taming Little Monsters. I’ll bet you’ll want to make one of these pretty projects yourself, too!
[Photo: Taming Little Monsters.]
Why are guided art lessons important for Children?
Guided art instruction is important for children for several reasons:
It provides a structure for learning: Guided art instruction gives children a framework for learning and practicing new skills. This can help them to better understand and retain the information they are being taught.
It promotes creativity: Guided art instruction allows children to explore different art forms and techniques, which can help to encourage their own creativity.
It develops fine motor skills: Many art activities involve the use of small tools and materials, which can help to strengthen children’s fine motor skills.
It improves cognitive development: Art activities can help children to develop important cognitive skills such as problem-solving, spatial awareness, and visual-spatial intelligence.
It allows children to express themselves: Art is a powerful form of self-expression, and guided art instruction can help children to develop their own unique voice and style.
It can foster emotional and mental well-being: Engaging in art activities can be a great way for children to process their emotions and feelings. It can help them to relax and feel more calm, and boost their self-esteem and confidence.
It can be a way to learn about different cultures and historical context: Guided art instruction can also provide an opportunity for children to learn about different cultures and time periods through art history and techniques.
Next Plan Idea:
- Summer Reading Printables and Tips for Parents
Have you read?
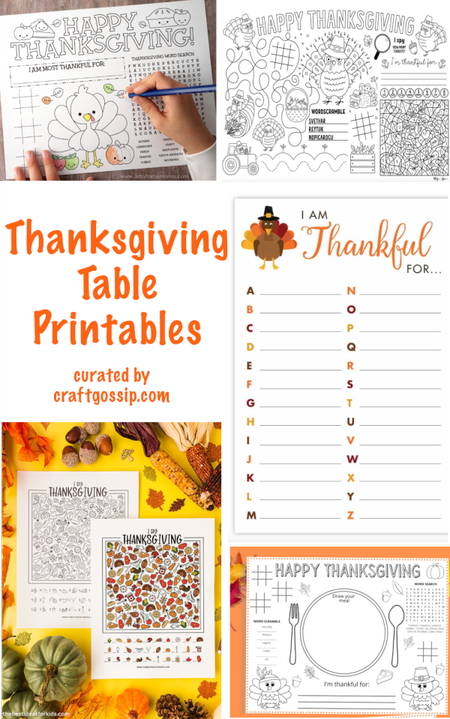
If you’ve got a bunch of kids (or even just a couple of kids) coming over for Thanksgiving, you might need some things to entertain them while they wait for the food to be ready. These Thanksgiving printables are great to use at the table or whenever you need something to fill a little time, and honestly adults will like some of these, too.
Activity placemats are a classic for kids, and they’re great to have on hand for Thanksgiving if there’s a lull between courses or while kids wait for food to get passed to them.
Crafting a Lovely Life has a few different options including a coloring sheet and one for writing what you’re thankful for, but my favorite includes a space to draw your dinner, a word search, word scramble and game grids for tic-tac-toe.
Artsy Fartsy Mom has one with a turkey to color, a word search, a place to write what you are thankful for and some tic-tac-toe spaces as well.
And Skip to My Lou has a few different printable Thanksgiving placemat activity sheets. The one that caught my eye includes an I-spy, a color by number and other things to color, words to unscramble and more that’s sure to keep kiddos occupied.
If you like word games, try the Thanksgiving Mad Libs from Jac of All Things, or this Finish the Phrase game from The Crafting Chicks (one person decides what the answers are and everyone else tries to guess what they picked). Both kids and adults can challenge themselves to come up with something they are thankful for from A to Z with this printable from PJs and Paint.
Don’t miss the printable Thanksgiving jokes from Kristin Duke Photography. A sample: Why did they let the turkey join the band? Because he had the drumsticks!
Play Thanksgiving Bingo with the printable cards from One Creative Mommy, or try a Thanksgiving I Spy from The Best Ideas for Kids.
that artist woman

Occasionally here in Calgary we can see the Northern lights.
This is the second project I’m working on with Kindergarten.
I found this great youtube video for this technique from wecreate art lessons.
I changed it a bit by adding some extra elements in the foreground to complete the composition.
MATERIALS REQUIRED:
– black construction paper
– chalk pastels
– posterboard or heavy paper for stencil
– kleenex
– watercolour paper, we used 90lb student grade
– blue and purple disk tempera
– plastic wrap
– textured wallpaper
– green and black acrylic paint
– a piece of sponge
– glue
– animal silhoutette cutouts, optional, you can create your own animals
PROCEDURE:

Cut a strip of watercolour paper the same width as your black construction paper.
Paint with purple and blue disk tempera.
While the paint is still wet lay a piece of plastic wrap on top.

You want to smoosh it so that there are wrinkles in it. This creates the ice like texture. If yours is not working it might be too dry. Re wet with the water and try again.
Leave plastic wrap in place while the paper dries.

I want my trees to also have some texture so we used textured wallpaper from the hardware store. You could also pass some paper thru a crimper or embossing folder (cuttlebug).
Paint with green acrylic or liquid tempera. We are using acrylic as tempera doesn’t stick too the wallpaper.

We then sponged on some black paint. I asked the students to not sponge too much so we could see both colours.

Watch the video to get the technique down.
I made quite a few stencils. If you cut your poster board or heavy paper in wide strips and then cut your wavy lines you get 2 stencils.
Make sure your stencil is as long or longer than your background paper.

Apply your chalk pastel along the stencil, we just followed the line.
I asked the kids to choose bright colours.

Use the kleenex and wipe upwards.


I asked the kids to swap stencils for each new line.
Continue all the way up the black construction paper.

When the watercolour paper is dry remove the plastic wrap.
Cut a curvy line from one side to the other. This will be the snow and ice in our foreground.
Glue into place.

When your textured paper is dry turn it over and draw some triangles on the back in different sizes.

Glue into place.

For the kinders I pre cut some animal silhouettes from the cricut for them.
If I had more time, (another session) we would have drawn our own animals and added them to our nightscape.


