If you don’t have time to paint this butterfly rock now, no worries! Pin it to your favorite Pinterest board so you can find it!
Butterflies for Beginners

This video tutorial is great for learning how to paint butterflies or beginners! Now that the warm weather is here, who says that you can’t make and create your own butterflies for your outdoor enjoyment?
If you’re new to the idea of painting butterflies , don’t be nervous. Once you see the simple process via the video below, you’re going to be creating epic butterflies without worry. And once you get a hang of the simple painting process, you’ll be able to branch out and try some other really fun rock painting ideas well.
I have a feeling that you’re going to have a blast painting these butterflies, so you could also try your hand at painting these fun flower rocks , too! You could literally fill your yard with bright and beautiful rocks.
This page contains affiliate links which means if you make a purchase using the link, I could receive a commission. Check out all the details here.
Pin these butterflies for beginners’ rock painting ideas!

If you don’t have time to paint this butterfly rock now, no worries! Pin it to your favorite Pinterest board so you can find it!
Butterfly crafts for adults
You’re going to love this step by step rock painting tutorial for beginners. Here are all the supplies that I use to do my projects.
For this rock painting idea, I used these paint pens. Also, you can purchase rocks too if you need then and you can purchase them here.
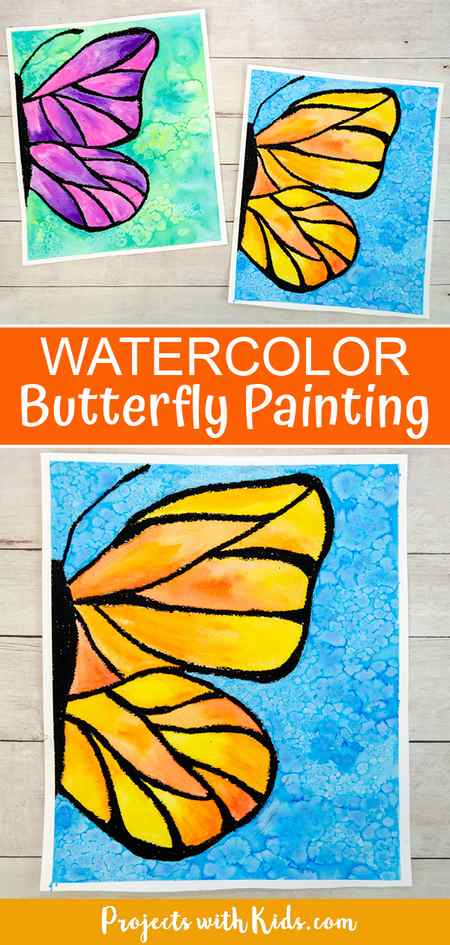
Create your own watercolor butterfly painting
This post contains affiliate links. As an Amazon Associate, I earn from qualifying purchases. If you would like more information please review my privacy & disclosure policy.

Supplies
- Watercolor paper
- Watercolor paint
- Black oil pastel
- Wooden board and painters tape (optional)
- Paintbrushes
- Coarse salt (optional)
- Pencil and eraser
Instructions for your butterfly painting
1. First, you want to prepare your watercolor paper. Taping your paper down to a wooden board will help keep the paper from moving around and also help the paper to dry flat and not wrinkle.
This is an optional step, so if you don’t have a board to tape your paper down don’t worry, your painting will still turn out great!
If you don’t have watercolor paper, you can try using white cardstock. The watercolor paint will behave a bit differently but it will still work.
You can use any size of paper you like, I cut our paper to 11 inches x 13 inches.

2. Use a pencil to draw one side of a butterfly. You want the butterfly body to be at the edge of the paper. Taking a look at some photos of real butterflies will help kids to draw their own butterfly picture.
Kids can use butterfly photos to help them draw out their butterfly wing shapes and also to draw in the patterns on the wings.
I looked at photos of Monarch butterflies to help draw my wings.
Remind kids to draw lightly, so they can erase their drawing if they need to.

3. Use black oil pastel to outline the butterfly wings and to color in the butterfly body. If you are looking at photos of different butterflies, you will notice that there can be quite a lot of black on the wings and some areas have thicker black lines and some thinner.
While kids are using their black oil pastel, they can make some of their lines thicker and some of them thinner.
Using oil pastels with watercolors can be a bit smudgy, so just remind kids to watch out for smudging the pastel with their fingers.

4. Once your butterfly is outlined it’s time to paint the wings! Have kids choose three colors for the wings. Again, looking at photos of real butterflies can help with their color choices.
For this example I looked at the Monarch butterfly again. I love how the orange and yellow colors blend together in their wings!
I used a watercolor pan set and liquid watercolors for this art project. You can read more about the best beginner watercolor supplies for kids here.
When you are painting your wings, paint one section at a time using a small to medium round brush. If you are painting straight from the paint set, then try wetting your section of wing first, before you paint, this will help to blend the colors together. This is called a wet on wet technique.

You can read more about different watercolor techniques by taking a look at these 5 easy watercolor techniques for kids.
Try painting each section with two to three colors and watch how they blend together as they dry to create beautiful patterns and different shades of colors!
If you mix your colors first with some water in a paint palette, then you don’t need to wet the paper first. Using the colors straight from the paint set will give you brighter colors, mixing your paint first with water will give you a lighter, softer look to your colors.
Continue to paint your butterfly wings and let everything dry completely before moving on.

5. Once your butterfly has dried, it’s time to paint the background. Kids can choose blue or green like our examples or any color they like. Just make sure the background color is different than the butterfly color.
With the blue background, I did one color using a wet on wet technique and then added salt for texture.
Using a larger round brush for this step will make it easier for kids to paint the entire background.

Mix up one to two colors for your background color. Paint the background first with a clean paintbrush and clean plain water.
Next, paint the background with your chosen color or colors. While the paint is still wet, sprinkle coarse salt on the background. Kids can choose to sprinkle just a small amount in a few places or sprinkle the salt all over their background.

As the paint dries it will create interesting patterns and textures. I recommend leaving everything to dry overnight if possible. Brush the salt off into a sink to reveal your background!
For the purple butterfly and green background, I used two shades of green and only sprinkled salt in a few places. So you can see that using more than one color and the way you sprinkle on your salt really makes a difference with how your background will turn out.

This watercolor butterfly painting is so bright and colorful! Kids will have fun using different watercolor techniques to make their butterfly art.
For more fun painting ideas, take a look at this galaxy spin painting idea and these fun rock painting projects!
More art projects kids will love


Follow me on Pinterest for more amazing project ideas.
Pin this watercolor painting for later
Yield: 1 butterfly painting
Beautiful Watercolor Butterfly Painting for Kids to Make

This beautiful watercolor butterfly painting combines oil pastels and watercolors. Kids will learn easy watercolor techniques to create this wow-worthy art!
Prep Time 10 minutes
Active Time 1 hour
Total Time 1 hour 10 minutes
Difficulty Medium


