Your gestures are what shape the face and give it expression: don’t fill it in all the way. Instead, add color to various areas, but don’t hesitate to go outside the pencil sketch contours.
How to Paint a Portrait in Watercolor
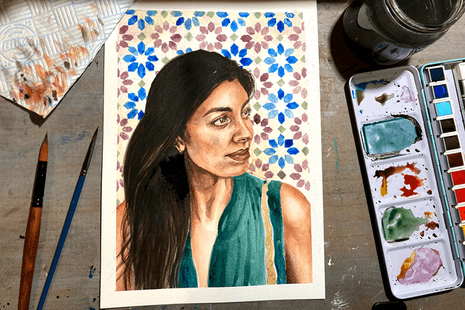
The subject of today’s video lesson is a portrait. I will show you how to paint a female portrait in watercolor using the dry-brush-on-moist painting technique, which is very versatile and is great for alla prima portrait painting. Here is the finished piece I will have at the end of this video lesson.

The beautiful model of this portrait is Natalie Richy. She’s a professional fine artist and also a tutor at the Old Masters Academy.
I cut a round shape out of 100% cotton watercolor paper and made a sketch in graphite pencil. I turn the sheet face-side down and, with a flat, wide brush, I’m soaking the reverse side with clean water. It is a cold-pressed watercolor paper with 300 gsm weight. When the reverse side is fully wet, I turn the paper over and stick it to the plastic board. The thin layer of water between the sheet and the board will keep this paper flat and adhered firmly to the board. I wet the face side of the sheet as well and let it dry for about 10 minutes. The paper absorbs water and whatever excess moisture remains on the paper’s surface can be blotted with a paper towel. The paper must be moist for the painting technique I am about to show you.

One of the main rules in watercolor painting is to paint from light to dark tones. So, I’m starting with light tonal values of the head. I will use a very limited palette of only four pigments to paint the flesh. The mix of raw sienna, alizarin crimson, burnt sienna, and phthalo blue will give me all the colors and tones I need to paint the model’s face, neck and shoulders.

The choice of colors, actually, is not as important as tonal values. In fact, it is completely possible to paint a realistic portrait in just one color. Such a monochrome portrait will have a good likeness and will look believable as long as you manage to portray construction and proportions of the face with the correct tonal values. Now, I will tell you the most important things about the dry-brush-on-moist watercolor painting technique. If this is the only information you take from this video lesson, it will be very beneficial for developing your watercolor painting skills. There are many “How to Paint a Portrait” tutorials, but this one is different because it explains not only how to paint this particular portrait but, above all, will give you the technique that will enable you to paint whatever you see or imagine, including portraits, still lifes, seascapes, and figurative artworks. All these artworks are done in the dry-brush-on-moist watercolor painting technique and I demonstrated how to paint them in multiple video lessons of the Watercolor Academy online course.
So, let’s talk about the dry-brush-on-moist technique. As I already mentioned, paper must be moist; this is fundamental for this technique. Moist paper means that its surface is almost dry and cool to the touch. Water is trapped inside the paper and there is a very thin layer of water between the paper and the plastic board. Because the board prevents water evaporating on the reverse side, the only way for water to escape the paper is through its surface. That is why the surface will remain moist for quite a long time, up to half an hour at room temperature and average humidity. This gives plenty of time for you to paint on the moist paper surface.

When the paper dries, from time to time, you can re-wet its reverse side by lifting half of the sheet and applying water with a flat, wide brush. Then, you can do the same on the other half. Also, you may add a bit of water on the front side without touching areas that have already been painted. I will show you how to do it a bit later when the paper requires moistening.
The second important thing for this dry-brush-on-moist watercolor painting technique is the amount of water to be loaded on the brush. As the name of this technique suggests, the brush should be dry. It doesn’t mean, however, that it must be totally dry. In fact, because the brush is loaded with liquid paint, it will be damp. You can see that, for this portrait, I’m using a round brush with quite a big belly. I’m only putting pigments on the tip of the brush; the belly remains damp but clean. To keep the brush damp, I do two things: First, I do not add too much water when mixing pigments on the palette. Actually, there is so little water that I can turn my palette on its side and the mix of watercolor pigments will stay in place without running down. And secondly, every time I put a new portion of mixed pigments from the palette onto the brush, I blot excess water from its belly with a paper napkin or towel. This gives great control over the wetness of the brush. Because the paper is moist, its surface takes pigments from the brush very eagerly. It’s very easy to achieve smooth tones and soft gradations because every brush stroke has slightly soft edges which stay in place and do not spread out. This gives great control over how the paint is applied.
Another great benefit of the dry-brush-on-moist watercolor painting technique is that you’re able to make small, well-defined brush strokes which remain sharp because the pigment mix is thick and the paper surface is not wet, but moist.
[ The full lesson is avaibale to Watercolor Academy members ]
You can see that I left unpainted white highlights on the pupil of the eye as well as on the eyelids, the tip of the nose, the mouth, and on the chin, and these highlights stay in place without neighboring brush strokes spreading out and covering them over. This is one of the main advantages of the dry-brush-on-moist technique, when brush strokes have slightly soft edges but do not flow uncontrollably. You may also see that, with this technique, I’m able to do small details with precision without changing this big brush for a smaller one. I will keep the paper moist and the brush damp to the very end of this piece, to get all the benefits this watercolor painting technique can provide.
At the same time, this versatile technique has its limitations. Because the paper has to stay moist, I only have a limited time to paint before rewetting it. This is totally fine as long as I plan to finish this piece in one session. It makes this technique ideal for painting alla prima. However, if you plan to paint in several sessions, you may do the first session using the dry-brush-on-moist technique and continue in the following sessions in, for example, wet-on-dry or dry-brush-on-dry techniques. These painting techniques, as well as many more, are fully described and demonstrated in the Watercolor Academy online course.
To answer your question, “Is it possible to re-wet the paper the next day, after it’s fully dried?” You may do so, but it might affect the watercolor paints that are already in place. You may wash out some pigments and dilute those that remain on the paper. That is why it’s advisable to do the piece in one session if you plan to only use the dry-brush-on-moist painting technique.
Let’s come back to the portrait. You may see that this technique allows me to do very smooth transitions between light and shadows without any borders between brush strokes, and also to apply well-defined small details with high precision. This is what makes this painting technique so versatile.
Art students often ask me how to paint realistic portraits. A good painting is well-drawn. What I’m doing right now is drawing a portrait with a brush in color. This means that I apply everything I know about how to draw a portrait, including human head anatomy, construction of the skull, proportions of the head and face, and understanding of the head’s planes that influence its tonal values. If something from this list is missing from your skills, you need to fill this knowledge gap by learning what is needed to paint realistic and recognizable portraits.
The knowledge of human anatomy cannot be underestimated. The shape of a human head greatly depends on the skull’s anatomy. In some places, the flesh and skin are only a few millimeters thick and the shape of the head closely repeats the shape of the skull. So, to begin with, I would advise getting familiar with the anatomy of a head. This subject might sound daunting but it shouldn’t be. You are an artist, not a doctor, and anatomy for artists is a much easier topic. If you don’t have a lot of free time, you can learn human anatomy for artists in a fast and easy way. It is fully explained in multiple video lessons of the Anatomy Master Class. This is a great course for both beginners and advanced students to learn all you need to know about skeletal and muscular anatomy.
Watercolor paper dries quickly so I’m moistening it with clean water, using a flat brush. Now, I can add the darker tones of the face, painting wet-into-wet. For these darker tonal values, I’m using a mix of the following pigments: raw sienna, phthalo blue, alizarin crimson, burnt umber, and sepia. I apply this mix with a flat brush. Now, it is time to take care of the hair. While I’m at it, I’ll explain the sequence of the watercolor painting steps. Whatever you paint in watercolor, it is better to start from light tones and continue to darker values. So, with the light tint, I painted highlights. Next to the lights, I’m adding mid-tones.
There is one rule that works in most cases: If the light is warm, the shadows, most likely, would be cool. So, the highlights I painted are slightly warmer than mid-tones. And I’m now applying the shadows which, in turn, are slightly cooler than the mid-tones. Introducing the cold-warm contrast into an artwork makes it more interesting.
With a clean, damp brush, I wipe out some additional highlights. I’m adding in dark tonal values using the dry-brush-on-moist technique. You may notice that these brush strokes are quite dry. They are also very dark. To achieve such a dark color, I mixed sepia and blue ultramarine.
Here’s one good tip: Even if you have to apply very dark colors, it is better to avoid using the manufactured black paint. You can obtain a dark, neutral gray color by mixing dark, complementary pigments. The comprehensive information about the color theory and how to mix different pigments is fully explained in the Watercolor Academy online course.
I mentioned that a good portrait painting is well-drawn. How to draw realistic portraits is a big topic on its own. It requires many skills you can learn at Life Drawing Academy. This academy has two courses: a self-paced, self-taught Online Course which contains 52 video lessons and comes with a lifetime membership and unlimited personal support from the academy’s tutors; and the Correspondence Course which is one-on-one personal tutoring that will be customized to your level of drawing skills and goals. Academy tutors will assess your level and create a special curriculum for you which will include up to 100 drawing tasks that will help raise your art skills to an advanced level.

I now wet the white margins of the paper with clean water, using a wide, flat brush. Wet paper is required for a dark background to be painted wet-into-wet. For the color of this background, I mixed blue ultramarine, phthalo blue, and sepia. I apply this mix with a wide, flat brush, taking care to leave a small gap between the background and the portrait outline. The background edge remains sharp next to the face and freely spreads in other directions. This is because I didn’t wet the bordering area around the portrait with clean water. A big brush helps to paint the background swiftly and smoothly. To fill the white gap between the dark background and the face, I’m using a smaller brush, which gives higher precision. This time, I apply the mix using the dry-brush-on-moist watercolor painting technique. This gives a nice sharp border between the background and the face.

At the back of the head, I want to make the border very soft. That is why I’m using a wide brush, painting over the hair to soften the border. While the paper is still wet, I can easily add a darker shade, wet-into-wet, and smooth it out softly. When watercolor paint dries, it becomes lighter. How much lighter depends on the paint, paper, wetness, and drying time. It may become up to 30% lighter, so I have to account for this and paint a very dark background. To prevent backruns, I’m placing a paper towel under the artwork’s edges. With the background in place, I will now do the finishing touches. I add some hair curls with a small, round brush, and absorb the spreading water with a clean, damp brush.
[ The full lesson is avaibale to Watercolor Academy members ]
To learn how to paint a portrait in watercolor, enroll now
Watercolor Academy Online Course
A self-study, self-paced course where you can learn how to paint in watercolor by watching video lessons and doing assignments
- Unlimited access to 80 watercolor painting video lessons
- Lifetime membership without deadlines
- Unlimited support from the Academy tutors
- Constructive critique of your artworks
- Member access to the Academy’s Art community
- Place in the Academy’s Students Gallery
- Exclusive members-only newsletter and bonuses
- Watercolor Academy Diploma of Excellence in your name
One-time payment – Lifetime membership
$297 USD
Personal Tutoring online + Online Course
One-to-one, unlimited and custom-tailored to your skills and needs Personal Tutoring by the Watercolor Academy teachers
- Everything in Online Course, plus:
- Dedicated team of art tutors
- Assessment of your current level of art skills
- Personalized curriculum tailored to your skills and goals
- Up to 100 art tasks with by-task assessment
- Unlimited one-to-one personal coaching with detailed per-task instructions and feedback
- Artwork critiques and results-oriented guidance
One-time payment – Lifetime membership
$997 USD
How to paint a watercolor portrait
I’ve been painting portraits for more than a decade, but I never get tired of capturing faces on paper. I paint in a variety of different mediums, but I like watercolors for the subtle color variations you can develop by layering different colors into skin tones. Watercolors are also great for combining a more realistic portrait with a stylised background, providing an easy and interesting way of giving your portrait a ‘painterly’ look.
Tips and techniques to make watercolor portrait painting easier
- Paint in light layers. It’s tempting to put loads of color down on paper right away, but using lots of lighter layers makes it easier to correct a mistake and to build up more smoother skin tones.
- Wait for layers to dry properly. Patience is a virtue when it comes to watercolor portrait painting – if you don’t wait for each layer to dry before starting on the next, your layers will muddy and blur into one another.
- Use different brush sizes. You’ll want a bigger brush to cover larger areas quickly, and a smaller brush to paint in fine details.
- Keep one clean brush for blending. A clean, damp brush can help smooth out harsh lines, or be used to “pull” paint across the paper.
- Keep paper towels to hand. A paper towel is essential for making sure your brushes aren’t too wet, and for quickly fixing any minor mistakes.
To create your own watercolor portrait, first of all – you guessed it – you’ll need some watercolor paints. I mostly use the Winsor and Newton Professional Watercolour tubes, as I find they dry to really bright, saturated colors. If you’re intending to sell your original artwork, then professional-grade paints are also important because the paint won’t fade over time.
If you’re just getting started, paint as a hobby, or plan to turn your painting into digital art to sell as prints, then a cheaper set can look just as good. I like the Winsor and Newton Cotman range. For this painting, I used a set from an Artful subscription box.
It’s also really important to use paper designed for watercolors. Thinner papers won’t be able to absorb the paint, so you’ll end up with crinkled paper that disintegrates as you paint more layers onto it. Most recently, I’ve been using the Cass Art own-brand paper.
I’m not fussy about the brushes I use, but I find that a tip that tapers to a fine point works well for the detail needed for watercolor portrait painting. It’s good to have at least a few different sizes – I swap between these as I paint.
Finally, it’s helpful to have some masking tape on hand to fix your paper to a desk or board. If you don’t have any, washi tape works almost as well.
Watercolor paints
Here are some recommended watercolor paint sets to buy…
Step 7
Doing the pullover and eyes.
Prepare a mix of emerald green and ultramarine blue (a tone complementing the one used for doing the skin: for a fairly strong contrast).
1) The pullover: dilute the color and paint it on quickly.
2) The eyes: apply the same color with the medium round paintbrush. Note: leave a clear white space to show the light reflecting in the eye. This reflection is what gives the portrait its sparkling, live look, so it needs to be done very carefully.
3) The pullover: quickly paint shadows to add volume. Use the wash brush to apply the same color, this time less diluted.

Step 8
Carefully adding finishing touches to eyes.
Work with the fine round pointed brush.
1) The iris: use the rest of the mixture to add shadows to the pullover, draw the contours of the iris and its upper part (where the eyelashes are casting their shadow). Remember to leave some white spaces.
2) The eyelashes and pupil: prepare a slightly diluted mix of purple, a hint of Sienna and a hint of blue. By using a strong purplish shade, you can keep the overall tone light (unlike black). Do the pupil lightly, leaving some white space. For the eyelashes: start from the eyelid and draw them with a flowing gesture, for a tapered stroke.

Step 9
Develop the shadows and dark parts. Here, it is better to use a pure, slightly diluted color instead of a dark shade: prepare a mix of pure red and (just a hint of) purple.
Use the fine round pointed brush to develop any shadows that are not strong enough with light paint strokes: the corner of the mouth, the base of the chin, the nostrils, ears, crow’s-feet etc.


