The swipe technique is probably one of the most recognizable acrylic paint pouring techniques. This technique is identified by lacing and cells that are outlined by the color that was swiped. The swipe color frequently is highlighted along one of the sides or through the center of the pour.
Acrylic Pouring Techniques – Easy & Fun Steps
We met with professional artist Celeste Jones to watch and learn from her as she prepped to pour acrylics for her next amazing work of art.
Pouring acrylic paint on your canvas is a great activity that doesn’t require brushes and it creates unique designs from your favorite color combinations. Although producing high-quality poured art does require a lot of experience and skill, the abstract nature of paint pouring can be ideal for beginners.
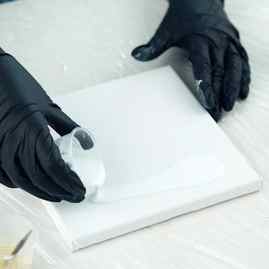
To prepare you’ll want to make sure you minimize the mess with this paint medium. Celeste worked over a table that had been covered with plastic wrap before she even poured the paint into the mixing cups. For those of you without a professional workstation, you can also use the inside of a shipping box lined with aluminum foil. This method will make for easy clean up once you have finished the painting.
You’ll need your favorite Arteza Acrylic Paint Set and an Arteza Stretched Canvas for this next step. Once you have your supplies ready to go, set 4 to 6 plastic cups (facing down) so that you can lay the canvas on top of it. This will let it drip off the sides as you work.
To complete your supplies for the activity, you will also need more plastic cups to mix the paint in, coffee stirrers or straws, gloves to protect your hands, and a painting smock or apron. You will also need glue. School glue and some water will do just fine, but for adults and more advanced painters, you can also use a latex-based paint adhesive like floetrol as your pouring medium. It is important to use the right medium in combination with your acrylic paint to make it more fluid.
It is possible to create a beautiful painting just by the way you move the poured paint on the canvas but to get the most dramatic effects, you’ll want to have a hairdryer handy as well.
Step-by-Step Techniques for the Best Acrylic Pouring Art
Step 1: Prepare your glue.

Celeste first poured the bottle of glue into a cup and added a splash of water to get the consistency that was desired. What you want is for your glue to pour easily, but not be too runny. In Celeste’s experience, a ratio of ~1 part paint : 3 parts pouring solution (glue+water ~50:50) offers the best results, but you may develop your preference based on the surface and medium you’re working with.
Step 2: Pour the glue on the canvas.
Once your initial round of glue is ready, pour the glue onto the canvas. If it’s too concentrated, you can pick up the canvas and let the glue glide around the canvas for more even distribution. This will act as your primary layer.
Step 3: Mix the glue and the other paints.
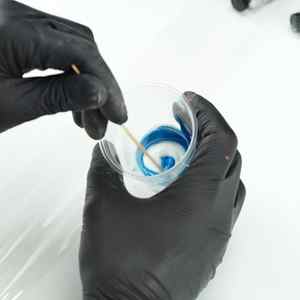
You should have a cup for each color you are going to use. Celeste poured some glue into a cup, about 1.5 ounces. She recommends that you add two pea-sized drops of regular acrylic paint. Once you’ve combined the glue with the paint from the tube, mix the glue and the paint using a wooden coffee stirrer (or similar stirring utensil). You will notice that the paint will retain much of its pigmentation, so if you want the paint to look more diluted, use less of it.
Step 4: Make art!
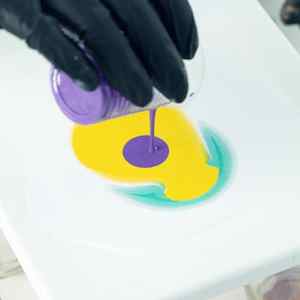
Celeste then got ready to pour the paint. She took each color and poured it one by one. Depending on how much you pour, you may want to move quickly so that it does not begin to dry before you’re ready to use the hairdryer. Remember that the first color you pour will be the primary color in the finished product. For this reason, white is a great starter color for beginners! Once the colors are poured, you can pick up the canvas and swirl it around a bit to create a unique combination.
Step 5: More glue.

To manipulate the paint even more, you can add more of the pouring fluid or glue around the design you’ve created. The paint should react interestingly by marbling the color even more. You’ll notice that wherever the glue is, that is where the paint goes.
Step 6: Use a hairdryer.
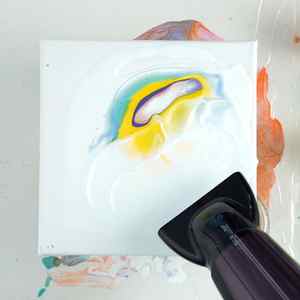
Once she let the paint flow to where she wanted it to on the canvas, Celeste used a hairdryer to make the paint form patterns.
Step 7: More paint.
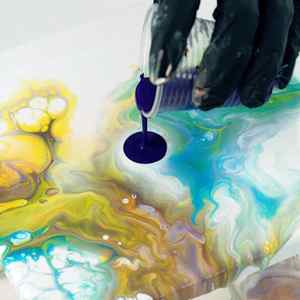
After using the dryer, more acrylic paint can be added to the canvas you are working on. Celeste then used purple to add another pop of color to her artwork.
Step 8: Add glue to the corners.

After swirling the fluid acrylic paint around for a bit, Celeste added more glue to the edges of the canvas. You do this when the paint starts to move around to let your paint get pulled evenly over the sides of the canvas to create a polished finishing look. To add an even more dramatic effect, use the hairdryer again.
Step 9: Time to dry.
Once the piece was ready, Celeste used waxed paper to gently pick up the canvas from the plastic cups and move it over to a safe area of her desk. The thing about acrylic pouring is that depending on how much paint you use, it needs a good amount of time to dry. So she put the painting somewhere out of the way and let it dry overnight.
Last but not least, gather all of your supplies, make sure that any of your clothes with acrylic on it goes right into the wash, and put the caps back on any fluid paint or glue.
Voila! Almost 24 hours later, the canvas with the spectacular poured acrylics had evenly dried and we were left with a magnificent swirled effect. All of her initial preparatory work kept cleanup to a minimum and resulted in a unique art piece that couldn’t be easily reproduced using any other method.
Frequently Asked Questions
How do I know my paints are ready for pouring?
Your paints are ready when you have a creamy texture that isn’t too runny. You can always test your mixture on paper first before you move it to a canvas. Also, consider how concentrated you want the color to be. If you want to dilute the color, you’ll need more glue, and therefore a little more water to maintain the right consistency.
How many colors should I use?
Start with 3-4 different colors of varying shades and a white or a black. That should be enough to achieve a unique poured art effect without overcrowding your piece or increasing the dry time. If you work with black paint, be very careful not to let it bleed into your other colors and gray out your entire canvas. Therefore, Celeste recommends avoiding working with solid black for your first few acrylic pouring projects.
How long will it take for pouring art to dry?
The drying time for paint pouring typically ranges from half a day to 2 days. The factors that affect the drying time include – the humidity level in the drying room, your pouring solution water to glue ratio, how much paint you used, the types of paints and canvases used, and how evenly you’ve distributed the medium.
How do I keep my art safe while it is drying?
The ideal drying area for poured art is a dark, cool, and dry room. This prevents sun damage or uneven drying, while also limiting drying time. Your canvas should be placed on a smooth, cool surface (ideally glass) so that your design dries quickly and evenly.
So, to summarize, this is what we learned from our afternoon of painting with Celeste Jones. Fluid painting is all about the prep. Taking the right precautions and having the right materials heading into your acrylic pouring project is going to make all the difference. Getting your glue solution and paints prepared before diving into fluid painting will ensure that you’re able to add all of the desired colors without running into timing issues with dried paint. This will allow you the optimal amount of time to pick up your canvas, twirl it about and make awesome effects using a hairdryer.
Once your design looks just the way you want it to, find a dark and dry place where your canvas will be safe for 24 hours.
We hope that our time with Celeste has inspired you to try this exciting and fun art form! Remember to stop by our online shop to enjoy free shipping on premium art supplies such as Acrylic Paint Sets and Stretched Canvases.
Watch this step-by-step guide on our YouTube channel.
How to Create Pour Paintings
The trend of Pour Painting and abstract painting in general means that it’s easy for you to create artwork like you are seeing in home decor stores and on Pinterest. There are many, many ways to create a recipe for Pour Painting. Basically, you need to mix a “pouring medium” with acrylic paints. The pouring medium binds to the paint and makes the paint flow better and keeps the colors separated longer.
One aspect to Pour Painting is the creation of cells. For many painters, this is what they are hoping to get with their pour. Silicone and heat are key in getting the best cell results. A couple of sprays of silicone in just one color used will get you good results. Silicone can be found at hardware stores. Many people use butane torches to apply the heat. At Craft Warehouse we used a heat gun.

Your Pouring Medium can be many things. We have experimented with water, Mod Podge (Glossy), dish soap, PVA Glue, Acrylic Flow Improver and more. How much you add will depend on how much paint you are using. Some people say a 1:1 ratio or 40% Pouring Medium to 60% Paint. The key to your first try is to add in a little at a time until you get the results you want. You want it to be fluid, but not too runny that it won’t adhere to the board. You can always add more, but you can’t take it out.
[Edit: Since this article was published there have been a number of paint pouring mediums that have come out that make creating the pour much easier. It’s still fun to experiment with lots of different ways so you can get the effect you want. But if you want ease of use, we recommend using a medium. This DecoArt Pouring Medium is a great choice].
Pour Painting is a messy endeavor, so it’s best to have a clean and clear work area, plastic tarps on the floor, and a large enough pan (an aluminum baking pan would be good – or a kiddie pool if you’re making large paintings) to hold the canvas and lots of paint run off. The drying time can be long, too, depending on what you have created, so make sure you can leave your painting someplace safe where it can dry.
Supplies:
- Acrylic Paints
- Pouring Medium of your choice
- Craft Sticks
- Plastic cups
- Heat Gun (If you use a hairdryer instead, make sure to keep it far away. Hair dryers are much stronger than heat guns).
- Drop mat
- Pan or container to put it in (make sure edges are high)
- Prop to hold up painting (could be a block of wood, a box or a brick. Should support the whole piece. If using a canvas, make sure it isn’t too small so that it imprints on canvas)
- Gloves
- Silicone Spray (optional)
Directions:
- Prepare work area. Cover table and floor with plastic tarps. Set out plastic cups for pouring paint. Place your canvas or wood propped up in the pan or tray. Add the paints you want to each cup and add the pouring medium until it has the consistency you want.
- Spray a few sprays of silicone spray into the colors of your choice. You can choose one color or all. The more colors you add it to the more cells it will produce once the heat is added.
- Once paints are mixed as you want you can pour them all into one cup. This is called a “dirty pour”. (You can also add them separately if you want, pouring on one and then the next in the way you want. This would probably be a better choice for larger paintings)
- Once the paints are all in the cup, you will quickly flip the cup onto the canvas. Or you can put the canvas on top of the cup and, holding it securely, flip it over. The suction will keep the cup in place until you pull it off.
- Pull the cup of and the paint will flow all over the canvas. Let it flow and feel free to tip or roll the canvas around to get the paint where you want it.
- Once you have it as you want it, use the heat gun to pop some of the air bubbles trapped in the paint (this creates the cells)
- Let dry for a long time. How long depends on how much paint you used and how big the painting is, but most drying times are 2-7 days.
Mix Your Paint (2)
This step is arguably the most important step when doing any type of acrylic paint pour. The consistency of your paint can make or break your swipe pour painting.
For a swipe, we want the paint consistency of the swipe color to be slightly thinner than a base acrylic pour. This ensures that the swipe paint can easily glide across the base paint without getting too caught up in each other.
If the paints are too thick, the swipe just pulls the base paint with it instead of creating a very thin layer of paint across the swipe surface areas. There are some artists that use thicker paints for a paint swipe, but they take more than a little practice to master so we’ll be sticking with a more common consistency.

Two Acrylic Pour Mix Recipes
Here are two of the acrylic pour recipes that we use for our swipe pour paintings.
Floetrol – Mix 2 parts floetrol to one part paint.
Elmer’s Glue-All – Create your pouring medium with 60% Elmer’s Glue-All to 40% water. Once that is done, use one part paint to two parts pouring medium.
For thick paints like heavy body acrylics, you may need to add a little more water. For craft paints and soft body acrylics, they will be close to the right consistency already but may need a drop or two more water.
Small Mound and Disappear Consistency
To measure consistency, we are using our mixing stick and pulling a good glob of paint out of the paint cup and dripping it back into the cup from about one inch away from the rest of the paint.

This consistency we are looking for is for the paint to drip onto the surface of the paint, create a small mound, and then immediately disappear. We generally use a double-wide popsicle stick.
A small popsicle stick would create a very small mound and disappear. A spoon or other stir utensil will not create much of a mound at all because more paint comes off at a time.
Swipe Color Should Be Higher Weight/Density
For a beginner, we recommend you use a titanium white as your swipe color. This color has a higher weight/density compared to other paints. See our Acrylic Paint Density Chart to determine your paint’s density.
When you swipe a higher density of paint over the top of a lower density paint, it is going to try and sink into the “lighter” paint. This is the key to creating cells and lacing that we see in an acrylic swipe painting.

Some other colors that seem to have a higher paint density than other colors that could also be used as a swipe color are the cerulean blues, yellow and red oxides, mars black, and cadmium colors.
Get a more details explanation on why paint weight/density matters when creating cells and lacing in our article Acrylic Pour Cells: Everything You Need to Know.
Add Silicone for Cells
Most artists use pure silicone or dimethicone to help facilitate the creation of lacing and cells in their acrylic pours.
Silicone should only be used in the base colors and not in the swipe color. The idea is that the silicone either sits on the surface of the base coast or is coaxed up through the base coat and breaks through the swipe color on top letting the base colors show through.

Our recommendation for beginners is to use 1 drop of silicone per 2 ounces of paint. In a 4 oz cup of paint, you would use 2 drops of silicone. A little silicone goes a LONG way and too much will ruin your painting.
If you do not use silicone or dimethicone in your swipe base colors, you will most likely get a ton of very small cells. The swipe color will also stay on top of the other colors in your places making it look more like a wash over the top of your painting.
Pour Your Base (3)
There are many ways to pour the base of your acrylic pour swipe. Almost any other acrylic pour technique can be used.
Our two favorite techniques are the traditional pour and a basic dirty pour.

The straight pour we choose to do most is just rows of different color paints all along the painting surface. This is a great base because once the swipe is done you can see the bands of each distinct color under your swipe color.
A dirty pour can be done as a flip cup or a straight pour and gives a little more depth to the design underneath your pour.
Cover the Painting Surface
One thing you do need to do at this stage is to make sure you’re whole painting surface is covered after you are done with the pouring the base coat.
When you do a fluid acrylic swipe technique, you will find that sometimes you don’t want to tilt anything off the painting surface after you are finished. The swipe comes out exactly how you want it.

Because of this, you want to make sure that every part of the surface is covered before you even start the swipe, including the sides of the surface. Those are the places most artists miss on a swipe pour.
Remove Excess Paint
As with coverage, you want when you finish with your base coat you want to make sure that you don’t have too much paint on that canvas.
Swipes usually have lots of cells and lacing and those get distorted when they are manipulated too much with tilting.
If we make sure we have tilted off most of the weight of the paint before we move on the swiping step you can avoid the need for any more major tilting.
Where Will You Swipe From?
The last thing we need to take into account is where we plan on doing our swipe from?

For beginners, we recommend choosing one of the short sites of your painting surface. By choosing the smaller side we will be able to swipe all the way across the surface in one long swipe.
More advanced practitioners can decide to swipe from any side, from a line in the middle of the surface, or out from the center to create a starburst effect.
Swipe (4)
As was just mentioned, the swipe can be done from a myriad of different places on the painting surface.
To begin, we want to pour a small line of our swipe color paint along the line that we want to begin our swipe. This does not need to be a huge about of paint as we are only going to be pulling a very thin layer of paint over the rest of the canvas of painting surface.
We have found great success by keeping our swipe line of paint between ½” and 1” wide. This way we don’t have too much of the swipe color left after the pour as it will end up being a solid line of the swipe color which isn’t always desired.
Hello, I’m David. I am a Computer Technologist by trade and I have always envied artistic people. For years I have been enchanted with all the amazing acrylic paint pours I see on social media. Come to find out, even a left-brained nerd like myself can create beautiful artwork with fluid acrylic pouring. I created this website to chronicle all the things I’ve learned on my pouring journey.


