Wait for a few hours for the varnish to dry before moving or touching the acrylic piece.
How to Varnish Acrylic Paintings
Varnishing an acrylic painting can help preserve the paint over time. Varnish is a thin protective layer that creates a barrier between the acrylic paint, and all environmental factors, such as dirt, dust, moisture and air.
The varnish you choose to coat your acrylic painting should be transparent and create a solid bond with the surface of the paint. However, it is also important that it can be removed, which we will cover in the isolation coat section.
Why should I varnish an acrylic painting?
When acrylic paint dries, the texture is more soft and malleable than oil based paints. In addition, acrylic paint can change form when exposed to extreme temperature and humidity. In addition, acrylic paint, due to the perforations on the surface after drying, is known to attract dirt. Therefore, when varnish is applied, this allows for an easier way to clean and protect an acrylic painting and limits the amount of dust and dirt that covers the surface.
There are many effects that result from varnishing acrylic paintings. They include:
- Finishing: Opt for either a glossy or more matte finish
- Color saturation: Varnish can enhance the color saturation of a painting, making the shades more vibrant
- Protect and clean: Varnish allows for paintings to be cleaned in an easier way, and protects the surface from dust, dirt, humidity and extreme temperatures
- UV radiation: Varnish protects acrylic paintings from UV radiation
Why do I need to apply an isolation coat?
An isolation coat is typically applied on the painting directly, before applying varnish. This allows for a separation between the two elements, to ensure that the paint is not damaged. In addition, applying an isolation coat allows for an easier removal process of varnish, in case you choose this option.
It is recommended to varnish acrylic paintings with a brush, as it allows for a smoother finish. However, this also depends on the surface texture. If the piece includes many textures, spray is recommended.
The process of varnishing an acrylic painting revealed
Using the right varnish, in the right way, is the ultimate way to keep your finished oil or acrylic paintings looking their best . Not only does varnish protect your artwork from the accumulation of dirt and dust, it also enhances the final look of your masterpiece with a radiant glossy, matt or satin finish.
Over the years, the varnish will act as a shield that prevents dirt and dust from damaging your painting’s surface. When the need arises, the varnish can be easily removed, and your painting can be revarnished, restoring its original brilliance. Read on for expert answers to frequently asked questions on varnishing paintings.
Which varnish should I use?
An artist’s choice of varnish often comes down to personal preference. You might choose a varnish for the sheen it provides, or because it has been used by your favourite painters. One of the oldest liquid varnishes is dammar , which gives a very high gloss. It remains one of the most popular varnishes, even though new products have been introduced to the market since its development.
Choose gloss varnish if you want to bring out bright, deep colours, but be aware that gloss creates a lot of reflection. Or opt for m att varnish, which means you avoid reflection, but colours will appear duller.
When can I varnish my painting?
You’ll need to wait until your painting is completely dry before varnishing it. For oil paintings, this means at least six months, regardless of what medium you’ve added to the colour. You can test whether an oil painting is ready to varnish by dipping a cotton bud in Sansodor and gently rubbing it on an area that’s not too obvious. If no colour transfers to the cotton wool, you can start varnishing.
What kind of brush should I use for varnishing ?
Use a flat, wide, soft and tightly packed varnishing brush, such as the Winsor & Newton Monarch Glazing Brush . Keep it clean and use it only for varnishing.
How do I apply varnish ?
First, choose a dust-free area where you can keep windows and doors closed. It’s best practice to varnish on a flat table or work surface – avoid working vertically.
Before you start varnishing, gently wipe the surface of the painting with a lint-free cloth to remove dust. Then stir the varnish well and pour it into a clean, flat saucer or tin. Load your brush, then wipe it on the side of the saucer so it’s not dripping.
Using long, smooth brush strokes in one direction, cover the painting in a thin coat, then turn it 90 degrees and use the same long strokes across the wet first coat to ensure an even covering. Make sure to only apply one layer of varnish like this, or the result will be patchy. For a demonstration, see this video tutorial on varnishing your painting .
Avoid going back over areas that you’ve done. If there are spots you’ve missed, simply allow the piece to dry completely and revarnish.
After you’ve finished, ensure that you shield the work from dust while it dries, using a protective plastic cover known as a tent.
How long does varnish take to dry?
You should leave varnish to dry for 24 hours before adding another coat.
How many coats of varnish does a painting need?
The number of coats you apply depends on both the type of varnish you’re working with and the finish you want to achieve. Applying more than two coats of matt or satin varnish could mean making your painting look cloudy, but with gloss varnish you can apply up to three coats.
If you’re using spray varnish, you could stick to two to three layers, or apply anything up to 50 coats if you’re after an extra high-gloss effect.
How do you properly store or display varnished paintings?
Make sure you keep varnished paintings separately from one another – it’s best to avoid leaning them together, as they may stick to one another. You should also steer clear of touching the varnish or using bubble wrap to cover them, as impressions may show in the varnish.
When displaying varnished paintings, hang them on walls or surfaces away from bathrooms and kitchens, and avoid placing them above radiators or open fires, to avoid getting them dirty too quickly.
What is spray varnish and when should I use it?
Spray varnish can be used on oil and acrylic paintings, it dries more quickly than liquid varnish – making it a good option when you need to varnish work swiftly, or can’t protect a painting easily while the varnish is drying.
Aerosol varnishes are also a good choice if your work has a fragile surface that could be damaged by applying varnish with a brush.
If you’ve worked in an impasto style, or with paint that has a rough texture, a spray will help you get an even coating of varnish and avoid the risk of creating bubbles or pools of varnish by applying it with a brush.
Can I varnish over watercolour, gouache or pencil ?
Varnishes work well with oil and acrylic colours. Their paint films are relatively thick, and are separate from the surface.
However, varnishes shouldn’t be used with gouache, watercolour or pencil drawings. The varnish would be absorbed by the paint or paper – or both – becoming an integral part of the picture, which can cause discolouration. Additionally, you wouldn’t be able to remove the varnish.
What is fixative spray? Does it protect paintings?
F ixative spray is a colourless fixative that protects charcoal, pastel, pencil and chalk drawings from smudging. Be aware that it’s not designed for use on paintings.
The difference between fixative and varnish is that while fixative is used to prevent smudging and smearing, varnishes change the sheen of a painting and protect it from dust, dirt and pollutants.
In this video tutorial you can see how fixative can also be used to build up layers of density when using charcoal.
Can I paint over varnish?
Although it may be tempting to go back and change a painting once it’s varnished, you should avoid doing so. It would likely disturb both the varnish and the paint beneath it.
What is glazing in painting? How is it different to varnishing?
While varnishing creates a protective layer on a finished painting, glazing is a technique used to unify light and dark tones, and create luminosity . It’s a practice that was pioneered by Old Masters like Van Eyke, Vermeer and Rembrandt .
In glazing, a transparent layer of paint – usually made with a single pigment mixed with a glazing medium – is applied over a painting before the varnishing stage. You can watch this video on the art of glazing for a demonstration.
What is an isolation coat in painting?
An isolation coat is a clear, permanent layer applied to acrylic paintings before varnishing. It’s necessary to prevent damage to the painting when later removing varnish, which should be done every five to ten years of a painting’s life, as dust and dirt build up.
Acrylic paint and acrylic varnish are dissolved and removed by the same chemical, so removing varnish without an isolation layer is risky.
Oil paintings don’t need an isolation coat because the varnish for oil colour has a different composition to the paint.
Do acrylic paintings need to be varnished?
When acrylic paint dries it’s particularly at risk of attracting dust, which can then become ingrained in the layer of paint. Varnishing adds a hard layer that protects the work – but you need to add an isolation layer to ensure the varnish can be removed without damaging the painting.
If you don’t want to varnish an acrylic painting, you could put the work behind glass instead.
How can I fix a dull painting?
It’s easy to confuse the need for varnishing with the dullness created by oil colour that has sunk into the surface. If the colour has sunk, you should avoid varnishing for now and instead use the ‘oiling out’ method shown in this video tutorial to revive your painting.
Sometimes artists varnish their work to help stabilise surfaces with added texture, or damaged layers. While varnish can certainly help with this, once it’s on it can’t be removed without damaging the work, so it’s recommended you then keep the varnished work behind glass to stop it attracting dirt.
Which Winsor & Newton varnish should I use for oil colour?
Winsor & Newton varnishes are all designed with specific types of colour in mind.
Winsor & Newton’s Dammar is the traditional ‘5lb cut’, if you want to use it with mediums (we do not recommend this, but millions of artists do it). Dammar gives a very high gloss. As it is a strong varnish, we recommend using Distilled Turpentine , our strongest solvent, when it needs to be removed.
Artists’ Gloss Varnish is the most popular varnish. It also provides a very high gloss finish. Stronger solvents will be needed to remove it as time goes by. Artists’ Matt Varnish is one of the most modern varnishes. It is easy to remove and gives a medium matt sheen. Artists’ Matt and Gloss varnishes can be intermixed to achieve varying sheens. We suggest a 50/50 mix to achieve a satin finish. Artists’ Satin Varnish is a superior quality, UV-resistant satin varnish, removable with Artists’ White Spirit or Distilled Turpentine.
Retouching Varnish is a UV-resistant gloss varnish which gives temporary protection to recently completed oil paintings. It’s quick-drying and should be used in thin layers. There are also gloss, matt, satin and dammar spray varnishes, and a retouching varnish spray.
Which Winsor & Newton varnish should I use for Artisan Water Mixable Oil Colour?
Artisan Gloss, Matt and Satin varnishes are formulated avoiding conventional solvents, making them ideal for communal studios or for those needing to avoid hazardous solvents. These varnishes can be used on conventional oil paintings as well as those created using Artisan O il Colour.
Which Winsor & Newton varnish should I use for acrylic colour?
Professional Acrylic Gloss, Matt and Satin varnishes are uniquely formulated to be removable and UV- resistan t. The satin varnish gives a mid-sheen finish, in between the matt and gloss varnish finishes. The Galeria Acrylic range also has its own collection of gloss, matt and satin varnishes.
Overview:
The varnishing process is actually quite simple. You want to apply two layers of varnish. One that is vertical, and one that is horizontal. This ensures that you cover every spot on your painting without applying too much varnish. Too much varnish can result in cloudy spots on your painting. So the key here is to get good, smooth coverage without going overboard!
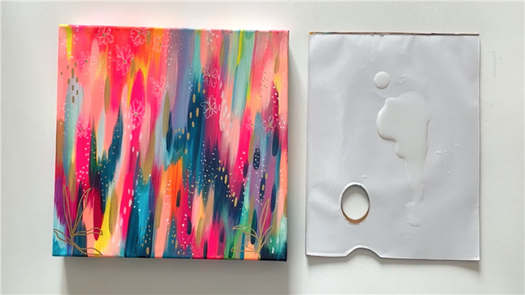
Start by pouring a good amount of varnish onto your palette. Remember that we’re just applying two thin layers, so keep that in mind as you’re choosing how much varnish to put on your palette.
Step 2: First Coat
Now it’s time for the first coat! Fill your brush and start to apply this coat vertically. The goal is to make the layer as thin and even as possible. Keep an eye out for any areas that are pooling and smooth them out so that your first layer is even across the canvas.
If you painted the sides of your canvas you can apply varnish there as well, just make sure that you create a smooth transition between the varnish on the sides and the varnish on the front of the piece.
IMPORTANT: Before moving on to the second coat, make sure that your first layer is completely dry!
Step 3: Second Coat
Once your first coat is completely dry you can move on to painting the second coat. I make sure to apply this coat horizontally so that I don’t miss any spots and the whole piece gets an even coat of varnish.
Just like with the first layer, the key is to get a thin and even application across the canvas including the sides.
Once your second layer is dry, your piece is all finished! I told you it would be a simple process!
Now all you need to do is clean your brush thoroughly and make sure to get all the varnish out. Then your brush will be clean and ready to use the next time you need to varnish a painting!


