Start by choosing a color palette: Add your paint colors to a palette beforehand, this way you can focus on painting and not waste time thinking about colors midway.
5 Tips to Make Painting Flowers from Life Less Frustrating

The artists you love may make floral painting look effortless. But it’s much more complicated than painting the first flowers you see and love.
Acrylic artist Melanie Morris (Ep. 34) knows that floral painting can be frustrating. She also knows that you can alleviate some of that frustration by making sure you walk through a few simple steps before you ever pick up a paint brush.
Here Morris offers five great pieces of advice for getting your still life set up correctly so that you have the best chance of creating a painting you love.
START SIMPLE
It can be tempting to buy a large $30 bouquet and go at it, but if you’re either just starting out painting or have just switched to flowers as a subject, Morris encourages you to start simple.

But don’t worry, simple doesn’t mean. simple. With flowers it never does. You’ll still be figuring out shapes and sizes and color mixing and the like. You’ll have your hands full even with a simple bouquet.
Grab just a few flowers (more on that below) and cut them down to fit in a small 4” vase.
DECIDE YOUR COLOR PALETTE (Before Walking in the Store)
It can be overwhelming to stand in a public place and make a decision about something happening later. Our human brains aren’t great at this. And when there’s a cart buzzing around behind you and you know they are waiting for you to move away from the sunflower bucket, well, it’s not a great place to be contemplating “Do I want my painting to be warm or cool?”
Luckily, you can make these decisions before you enter the store. Morris suggests you decide on your color plan and your shape plan before you go in. Maybe have a few you could use just in case there was a run on carnations.
GET ODD
The human eye loves odd numbers. So as you work to set up your simple still life flower design, make sure that you have three, five, or seven stems of each flower.
As you arrange your odd number of flowers, Morris says to think about how to move the viewer’s eye around the bouquet (and around the picture plane.)
For example, if you have a pink flower shape in the bottom left, add another in the right side and upper left. Move the color around and therefore the viewer’s eye.

SHINE A LIGHT
A strong light is your friend when painting flowers. (Really any subject.) Light defines shapes and gives you fun contrasts to work with including light versus dark and warm vs cool.
Your lighting setup doesn’t have to be complicated. If you have a window, you could set up your still life next to it. If no window exists in the right place, grab an inexpensive clip on light from the hardware store. Make sure that the rest of the light in the room allows for a real sense of light and dark on your subject.
In Morris’s studio she sets a clip lamp on the side of her window to create to create dramatic shadows.
Morris knows that light not only gives you more interesting shapes to play with, it also gives the flower shapes that don’t have strong silhouettes a bit more variety.

THINK SHAPES
All flowers have a silhouette. Morris encourages students to think about the shapes they want going in.
Morris stays away from like shapes. For example, if she knows she wants sunflowers, she may not also include a brown eyed susan because they are essentially the same silhouette. Or she won’t use both gerber daisies and zinnias in the same arrangement because they are too similar in shape. She instead will choose just zinnias or just gerber daisies.
GET PAINTING
And always, Morris encourages you to just get painting. Follow these steps to help you start strong, and then it will be about learning how you work as an artist.
Get more ideas on how to get better at painting by joining the Learn to Paint Podcast newsletter! Add your name and email below.
Easy Flower Paintings:
SUPPLIES YOU’LL NEED:

- Deco Art Texture Medium Paint Tube https://amzn.to/2BZPANj
- Plastic Artist Palette Knife Set https://amzn.to/2Gyrn
- Cobalt Blue Hue Americana Premium Paint https://amzn.to/2UXv3O1
- Quinacridone Red Americana Premium Paint https://amzn.to/2Gn0bTP
- DecoArt Cerulean Blue Americana Premium Paint https://amzn.to/2UVw3SJ
- Yellow Green Light Americana Premium Paint https://amzn.to/2N7M2ul
- Diarylide Yellow Americana Premium Paint https://amzn.to/2GzC17Q
- Vermillion Hue Americana Premium Paint https://amzn.to/2GD7Oov
- Canson Foundation Disposable Palette Pad https://amzn.to/2E4h2IG
- 16 by 12-inch canvas https://amzn.to/2I9irlb
Easy Flower Paintings STEP BY STEP TUTORIAL:

- Create a palette of colors. Choose 5 or 6 colors to use and then mix them with each other or by adding white to create in-between hues of color. Mix in some texture medium to create easy dimension.
2. Paint the background- by adding dots of paint directly onto the canvas itself and then using a wide brush moving the paint to cover the entire canvas.

Use up and down strokes to create a smooth even finish. I like to use a dry brush without any water to create the background.

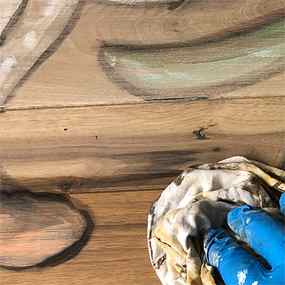
3. Create simple flower shapes– using a palette knife. Pick up two shades of paint onto your palette knife and then create petal shapes.

Try not to overwork the paint- the colors will all blend if you work the paint too much. Let there be variations in color.
4. Add different shades of leaves– by using two or three hues of greens. All of our flowers are of different colors, so create different shapes and colors of leaves too. This adds interest to your composition and makes the flowers stand out.

5. Fill in the centers- of the flowers by using a smaller brush. I like to heap the paint in the centers- it adds texture and a pop of color.

6. Add fillers in the background- by painting in dashes, dots, and tiny leaves. I like to use white for this, it adds a touch of contrast and whimsy.
Add smaller leaves by mixing the leftover paint on the palette.
This is an important step that will tie in all the flowers nicely and create a flower bouquet feel.
ALL DONE:
I am calling this one “A summer day of rainbow flowers”

It’s everything that this dreary, cold, snowy Minnesota day isn’t. I’m definitely feeling the winter blues this week and this bright colorful flower painting cheered me up immensely!

More Easy Flower Paintings:
Easy Flower Paintings like the ones below look great on handmade cards, notebook covers, in your sketchbooks or journals, or as a piece of wall art! Grab your supplies and let’s paint!

Supplies used:

- Paints: I recently purchased my first Gouache paints! This set is super inexpensive and comes with just the basic colors.
- Thick Paper: I used this super thick Watercolor paper that is 140lb in weight. The heavyweight paper allows us to layer paint and add water without too much warping of the paper. My paper is 11 by 15 inches in size.
- Paint Brushes: Use a Round Paint brush- you can paint leaves beautifully with a round paintbrush. I’ve used a Round 6 and Round 4 brush today from this set. I love that comes with a zippered travel case!
Tips and Tricks:


- Always start with a sketch or outline! Take time to perfect your pencil under sketch. This is the most important step- it’s easier to fix your composition at this stage with just an eraser
- There are a couple of ways to transfer a floral sketch onto your paper- You can freehand sketch the florals or use a graphite sheet like this to help transfer the image. I’ve used a lightbox to trace my sketch as well- and you can see that in my previous video here.
- I’ve used a Round no 6 paintbrush here because that suited the size of the petals I had drawn. If you are painting on a smaller paper, switch to a smaller paintbrush instead!
- For all the details- I used a thin Round 4 paintbrush. This brush is great to paint thin lines – like stalks and veins on leaves. If you find that your hand is shaky and the lines aren’t coming out too neatly- switch to a black pen instead to add these details.
- I like to mix my colors unevenly and then paint my petals. This adds so much more detail and color variation to each petal. Think nature, no two petals need to look identical!
Free Template Download:
Enjoy this free floral outline template friends! Print and refer to it while sketching if needed. You can easily resize this to be smaller or larger by increasing to 50% or 200% the print box on your computer.

Free Floral Template Download
How to Paint Flowers
Learn how to paint simple flower motifs or complex floral details on furniture and objects. This easy tutorial for beginners is a great way to tie in many elements of a room, creating a consistant and thoughtful space.

Painted Floral Details
Floral patterns used as accents in fabrics and furniture are common place details in the English Country home. These graceful and organic patterns complement the cozy interior of this style and work particularly well with lace window treatments, an heirloom tea service set and the natural and rustic charm of wooden ceiling beams and slightly textured walls.
Antique Glazes and Aged Finishes
Antique Glaze Create the perfect antique finish. Furniture, objects, paintings, wall and ceilings. Our exclusive line of custom antique glazes are idealy suited for interior and exterior applications. This acrylic based medium is eco-safe, easy application and clean up, with enhanced color saturation. Great for all weather conditions. Pre-mixed colors for historic application, thematic and geographic design styles.
Tip
Find patterns in wallpaper
I’ve chosen the floral motif for this demonstration from an antique wallpaper pattern. You can use different patterns to meet your interior needs. Patterns from wallpaer selections work especially well, as they tend to be rendered in an illustrated manner that facilitates an easy tracing withn tracing or transfer paper. Often there is no shading involved, with depth being created by a tone-over-tone pattern. Wrapping the image over edges and sides help impart an organic, playful style.
Download the floral pattern for this tutorial. You may need to re-scale the image to fit your object or furniture.
Color palette Earth Tones

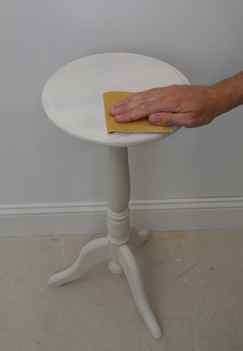
Step 1: Prime and Sand
Prime the table with a water based acrylic primer and allow to dry. Sand the entire table with 220 grit sandpaper, sanding in the direction of the grain.
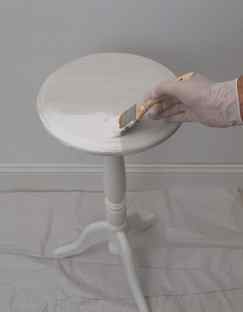
Step 2: Basecoat
Brush on the base color, Antique White. Allow to dry for 4 hours.


