You will love this snowy Winter trees toddler painting activity. A winter themed painting activity is so much fun for kids. Your toddler will love painting the trees white with a marble, and you’ll love the fine motor and creative skills being used in this simple activity!
Tips for painting winter trees
But it is the bare branched, lacy looking tree that can be the most challenging. Why? Because we try too hard to put in every branch and twig and we end up something looking like a stick poking out of the snow.
Another challenge is to get the bare trees to look like they are part of the landscape and not ‘stuck’ on the background. Again, we sometimes try to hard and spend all of our efforts painting the tree and branches and forget about the background. Then try to put it in around the tree. Challenging!
How can we avoid some of these winter tree challenges? Here are my top three tips.
- For those lacy looking bare branched trees in the distance: It is easier to suggest the laciness. It is all an illusion. I like to scumble a nice muted distance color such as a muted purple or grayed green up into the sky. Then I pull some of the sky color on top of the trees muting them even more. The next step is to take the sky color and put in a few well placed sky holes to break up the mass of the tree. Finally I take a sharp edge of a pastel or a Nupastel and draw in a trunk and a few very light branches. I use very little pressure because I want these branches to be light and airy.
- For the larger bare trees in the foreground : When blocking in the painting if I have any larger bare trees I roughly block in the trunk and any big main branches. I then develop the painting as usual. I complete the background. what is behind the tree whether it be sky or more ‘stuff’ BEFORE I work on the tree itself. It is much easier to paint the smaller branches and twigs OVER the background rather trying to paint the background up to the branches.
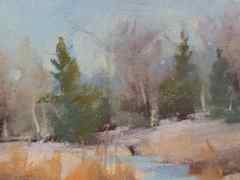
- TRY A HOMEMADE SURFACE! If you find that you get bogged down with the details of a winter tree and you want a more suggestive impression of the tree. try a homemade surface with an irregular texture. The rough brushstrokes of the ground won’t allow you to get too nitpicky with details. The surface can do a lot of the work for you if you let it! (see the top painting which is on a homemeade surface)
Yo can read more about homemade surfaces in this post HERE I will also be posting more homemade surface information this week so be sure to come back. If you haven’t signed up for email updates have a look at the sidebar on the right and sign up! Thanks!
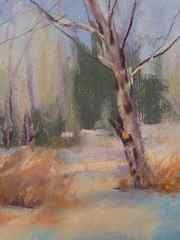
Painting Winter Trees in Cornwall with Derwent Pastels By Tony Hogan
For this work I used pastel pencils and pastel blocks. The support paper can be of your own choice but certainly one with a ‘good tooth’. I chose Colourfix-midnight blue by Art Spectrum.
What you will need:
- Paper: Colourfix-midnight blue by Art Spectrum
- Pale Spectrum Blue
- Cerulean Blue
- Saffron
- Flesh
- Raw Umber
- Seal
- Naples Yellow
- Indigo
- Dioxazine Purple
- Carbon Black
- Ionian Green
- May Green
- Fresh Green
- Process Yellow
- White
Derwent Pastel blocks in (or similar as these are no longer available)
- Ionian Green
- Fresh Green
- Process Yellow
- Seal
- Naples Yellow
- Indigo
- Dioxazine Purple
- Carbon Black
- Pale Spectrum Blue
- May Green
- Cerulean Blue
- Saffron
- Flesh
- Raw Umber
- White
1) Working first with pastel blocks, to achieve coverage of large areas quickly, I select two different shades of blue: Pale Spectrum Blue & Cerulean Blue plus White. Using free flowing sweeps across the paper, I lay these down using the Cerulean Blue on the top, Pale Spectrum Blue on the middle and White at the bottom (use your finger or a paper stump to blend). The laying of deeper tones higher with white tones lower creates aerial perspective, thus giving your background a 3 dimensional aspect.
The bottom right of the work is left untouched at present knowing it will be developed later as a darker area.
2) This painting was created from a photograph taken earlier in the day so the overall composition had been established with the camera. However, free hand interpretation of this, to establish a better image, was the next step.
Both pastel pencils and blocks where used at this time. First the branches of the skeletal tree using Saffron, Flesh and Raw Umber pencils. Then the initial marks of denser foliage with blocks of Dioxazine Purple, Ionian Green and Fresh Green.
3) Staying with the same colours, I develop further the structure of the skeletal branches. Then, using the shortest edge of the pastel blocks, additional development of the lower dense foliage is added. Using the shortest edge of the block helps create a natural foliage shape.
4) To balance the painting it is necessary to additionally develop the lower, denser foliage. Working in layers across the whole picture is vital to good art work (as opposed to finishing one area first).
The darker lower area is developed with pastel blocks in Indigo, Dioxazine Purple, Ionian Green, Naples Yellow and Raw Umber.
5) Note: as foliage grows to sunlight leaves sizes get smaller having received less nutrition from the roots. To illustrate this, use the short edge of the blocks at different angles and pressures as needed.
6) As you advance the work, it is important to pay attention to the harmonious aspect of the image by adding marks to both the lower and higher areas. The green foliage climbing the tree on the right is added (here I include May Green from the pencils) as are the dark smaller trees to the lower left. Overall development of the main foliage below the main tree, is brought to life with the addition of Process Yellow to the left and top of the foliage and Indigo and Carbon Black into the darker areas. Using the Saffron colour pencil, hundreds of small flicks, to represent thin twigs, are drawn to the lower left of the work – around and behind the small dark trees.
7) The counter-change of the dark shadowed areas to the right of the brightly lit skeletal branches is one aspect that drew me to the view. To give full reflection to this feature I add darker shading under the tree branches. I add additional small, brightly lit, skeleton trees to the middle right side of the main foliage area using the Saffron pencil. Further working of the green foliage and strengthening where the light catches the left and top is executed.
8) Heading for completion, there is still work to be done on the skeletal branches of the main trees. When drawing a large amount of sun seeking small twigs, note how they are not all attached to their branches but importantly they always point upwards, even where a heavy branch hangs lower.
9) Finally the dramatic difference of light and dark aspects create the catalytic impact of this stunning view. So allowing plenty of time and attention to establishing this is worth the effort.
Thank you to Tony Hogan for providing this blog for us. You can discover more of Tony’s work on his Instagram, Facebook and website.
You can purchase your own Derwent Pastel Pencils here or purchase the Derwent Pastel Collection here.
Snowy Winter Trees Painting Activity
Painting activities are perfect opportunities for your toddler to explore and learn. This activity is easy to set up but you can reduce mess – and stress – with a little preparation.
Cover the work area with drop cloths and wiping-up cloths. Protect clothing on your budding artist – and you! – with a paint shirt or apron. A pack like this is perfect for painting.

Supplies for painting Winter trees
- Cardstock
- White paint (I always recommend washable paint and a pack like THIS ONE is perfect to have in your craft cupboard).
- Green craft foam sheet
- Marble
- Shallow plastic container
- Egg carton
Draw half of a tree outline on the folded edge of a piece of cardstock. Cut out the shape.
Open the fold and place the pattern on a piece of green craft foam. Trace around the pattern and cut out the tree.
Instructions for painting winter trees
Secure the tree to the bottom of a shallow plastic container with a piece of rolled tape.
Drop a bit of white paint into the container next to the tree. Place a marble in the container.
Tip the container from side to side so the marble rolls around through the paint and over the tree shape. Your toddler might need a little help with this at first.
If preferred, kids can roll the marble around with finger tips. This is great for engaging those small muscles, helping to develop fine motor skills.
Your toddler will love watching the marble spread snowy white paint onto the tree!
Make observations with your toddler as you play together to support language and cognitive skills.
Name the colors of the tree and snow; talk about activities you like to do in winter.
Cut a small slit across the top of an egg cup and insert the painted tree into the ‘tree trunk’. Glue cotton to the tree trunk for winter snow.
This simple painting activity is a great way to learn about the winter season with your toddler. Build fine motor motor and language skills as you explore winter trees.
We would love to see some of your crafts and activities in action! Share them in our Facebook Group or over on Instagram (follow @myboredtoddler and use #myboredtoddler so we can all see!)
If you enjoyed this Winter themed toddler activity then you’ll love:
About the Author
Heather is a former preschool teacher and founder of preschooltoolkit.com, a website providing early learning resources for teachers and parents. She focuses on creating fun crafts and activities that engage developmental skills while promoting hands-on learning through play. Follow her on Facebook, Pinterest, Twitter, Instagram and Google+


