
Loved this, only came across these tutorials when a work colleague said he loved kingfishers. This was great fun and loved the slower pace tutorial and great tips along the way. Thank you!
Primrose Jones
Utilize acrylic medium to produce feather paintings
Frequently Asked Questions:
1. Is that a painting or a photo on that feather?
Every feather is hand-painted by me.
2. Wow! How do you do that?
Lots of patience, a steady hand, and a very small paintbrush.
3. How long does that take you?
The time it takes to complete a feather painting ranges from 2 hours for birds all the way up to 20+ hours for portraits and landscapes depending on the size of the piece and details involved. (That does not include the time it takes to prepare the feather prior to painting, and then delicately mount and frame it when it is complete.)
4. “Are you of Native American descent?”
It’s ok to just ask me if I’m Native American. Yes, I am Lipan Apache – a tribal member of the Lipan Apache Band of Texas. You can read more information about our tribe here: www.TheLipanApacheBandOfTexas.com
5. How did you come up with the idea to paint on feathers?
Here is an excerpt taken from my biography on my official website (www.featherartbybrandydavis.com) that explains it all:
“I had just returned home from a powwow. As I was putting my regalia away I came across the Eagle feathers that we Lipan women wear in our hair during our gatherings; Eagle feathers are very sacred to us and hold great meaning. I would never paint on an Eagle feather, as they are so sacred to us, however, as I looked at the feathers in my hand I was reminded of my Ancestors, most of whom I never had the honor of meeting. I was also reminded of the resonant beauty of our people as they danced earlier that day and the silent beauty of our elders as they told us stories about their lives. As I sat with the feathers for a moment, it suddenly hit me that being able to paint these rare moments on such a meaningful canvas would truly allow me to capture not only the image, but the memories and honor of those whom I paint.”
6. What kind of paint do you use?
Artist grade acrylic (brands vary)
7. The paintbrushes you use must be tiny! What size paintbrush do you use?
Please read my review on paintbrushes for feather painting here
8. Do you use a magnifying glass to paint on feathers?
Generally no, I do not. I find the magnification of a feather to be too distracting while I am painting, being that I am able to see every dip and groove – it just adds more “eye clutter”. I rely on my good ol’ eagle-eye vision and plenty of light to paint my miniature portraits. But that is just my personal preference – if you want to use a magnifying glass, then by all means – magnify away!
9. But don’t you know painting like that is bad for your eyes?
That’s why I eat plenty of carrots! Although I may need glasses one day, for now I am relying on the “use it or lose it” technique – and for now it’s working…my vision seems to be slowly improving (no kidding!)
10. Did you go to school for art?
I was very lucky to have a high school art teacher, Mr. Gravely, who was very passionate about art and went above and beyond for his students – He is the one who really helped me start to develop my love of art. After high school I briefly attended the Academy of Art San Francisco for a summer in 2002 (which was a wonderful experience). But other than that, mostly everything I have learned is due to my own experimentation and practice, practice, practice.
11. Do you teach art classes, offer workshops, or do public art demonstrations?
Currently I do not teach art classes as my studio space is very limited – however sometime in the future I would love to open up my own gallery and have a special room dedicated to teaching art to adults and children.
I do offer workshops. Please contact me for fees, traveling capabilities, and availability.
I also offer public art demonstrations wherein I will do painting demonstrations for 1-2 hours at a time in various public venues. Please contact me for fees, availability, and my current traveling capabilities.
12. What kind of feathers do you use for your feather paintings?
Turkey, goose, and pheasant are my feathers of choice.
13. Do you paint on Eagle feathers?
I do NOT paint on Eagle feathers. If you are planning on painting on feathers, please study the Migratory Bird Treaty Act to find out which feathers are legal to paint on and which feathers are protected by law.
14. Are your feather paintings for sale?
Please visit my official website: www.FeatherArtByBrandyDavis.com to view which of my feather paintings are currently available for purchase.
15. Do you participate in art shows?
When my inventory is substantial enough, I absolutely love to do art shows. I will soon post updates about my upcoming events and showings.
16. Can I see your work in galleries anywhere?
Currently my work is not displayed in galleries, but I will post updates when it will be available for viewing and purchase in certain galleries.
17. How can I become a featured artist on your website?
If you are interested in becoming a featured artist on The Feather Artist, just send me an e-mail at [email protected] (Featured Artist inquires only please. For all other art-related inquires and comments, please contact me here) and tell me a little about yourself and your art medium, along with 3-5 images (JPEG format is preferred) of examples of your work – and if you have an online portfolio please include the link to that as well.
NOTE: Your artwork does not have to be feather painting or Native American-related – All art forms are welcome!
If you are selected as a featured artist I will notify you via e-mail with additional information.
18. Why do you have your pumpkin carvings on a website about feather painting?
Because in my crazy little world, anything can happen!
19. Haha…But seriously, I thought this was a website only for feather painting and general painting advice?
Anything art/craft related may show up on here from time to time. If I decide to make Santa faces out of Popsicle sticks during Christmas, then I just may do a post about that too. You never know…
20. Who is your favorite artist?
Well, that all depends on what medium you are referring to. I actually am a huge fan of a few people’s work. As far as painting goes, one is Liz Lemon Swindle for her beautiful photo realism and her amazing inspiration behind each of her paintings. I have also always been a fan of Don Crowley who is an amazing western artist. He does such a wonderful job in capturing the spirit of the Apache people. Tae Park’s use of light and softness mixed with heavy brush strokes is wonderful at capturing emotion in his paintings. And lastly, but certainly not least is Bob Ross. (I mean really, how can you NOT like Bob Ross?) He embodied the true spirit of what it was to be an artist, and not to mention his manner of teaching painting techniques, calm charisma, and gentle sense of humor still continues to inspire myself and others. And not to mention, anyone that paints happy trees is awesome in my book.
As far as other mediums, or specifically sculpting, I have obviously become a fan of Ray Villafane’s work over the years. I stumbled upon his work in about 2009, and like everyone else who happens upon his work, I was just in amazement. Through him I learned of other sculptors such as Andy Bergholtz and Franz Messerschmidt who do phenomenal work as well.
Having said that, my all-time favorite artist is Michelangelo Buonarroti. Sculptor, painter, poet, architect, and engineer. He is undoubtedly one of the greatest artists of all time. All of my work over the years has been greatly influenced, in some way or another, by him, his techniques, and how he perceived the world of art around him.
21. How did you get into sculpting 3D pumpkins?
Back in 2009 I stumbled across some of Ray Villafane’s work. Thinking I could do that too, I ended up giving my first 3D Pumpkin a shot with some old sculpting tools I had laying around leftover from high school ….which didn’t go so well. I tried to mimic one of Ray’s pumpkins and it came out alright. Having said that, I still entered it into a local contest and it won. The following year I carved 2 more – I still have the photos from those first 3 pumpkins I ever carved – looking back on them, let me be the first to say, “They sucked” – so you will not be seeing those photos any time soon.
In 2012 I saw Sullen Art Collective and Villafane Studios was putting on an online pumpkin carving contest. I’m not sure what was sparked inside of me, but I just knew I could win (with hard work)…So I got to carving and started challenging and really pushing myself – I’d stay up through the nights, only getting about 2 hours of sleep on some nights, trying to finish pumpkins (and get used to using new techniques with this new medium). I remember having so much fun and at the same time feeling very odd that I was exploring an art form that I would have NEVER predicted I’d ever even try.
Long story short, I ended up winning the contest, and that ignited a whole world of possibilities and opportunity, all of which I am still exploring til this day. I heard a quote once that says something to the effect of, “It’s not a matter of where you take your art, but rather, it’s a matter of where your art takes you….” I get it now, and I live it.
Question not answered?
Please feel free to contact me and I’ll be happy to help as best I can!
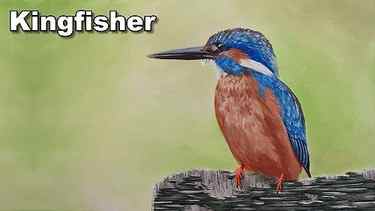
Class Description
Kingfishers have incredibly vibrant colours and are like the hunter gatherers of the bird world. In this class we will paint a male kingfisher in acrylic.
During the class you will learn:
1) How to use white space correctly
2) How to use a simplified background which enhances the focal point
3) How to create a feather effect
4) How to paint a weathered wood effect
5) and much more.
Latest Reviews
Loved this, only came across these tutorials when a work colleague said he loved kingfishers. This was great fun and loved the slower pace tutorial and great tips along the way. Thank you!
Primrose Jones
Unlock the Follow Along Class HERE
Short Class Video
We will work on a nice long canvas to give the bird lots of looking room.
We will start with the background and work our way forward.
Paint the background

Give the background a light spray to help the paint flow then cover it with a layer of white. The background is pretty light so this layer of white will save us a lot of colour mixing, as we will be blending and mixing at the same time on the canvas. To ensure the paint doesn’t dry mist it with water.
Now lets start adding colour to the background I am going to use sap green and cadium yellow to get the green shadings. Pick up tiny amounts of paint on the brush at a time and work it into the white. Then add more to darken.
On the far left I add some raw umber. Keep all the shadings smooth to ensure the background looks out of focus. Dry the background so we can move to the kingfisher.
Paint the body

For the body we use burnt sienna and plot in the dark areas.

Now go two to three shades lighter again and add this tonal value in and so on. When you do this use a chopping motion. By the time you have added all the tonal values in the body will be completed and all the canvas will be covered in paint.
What we are doing is simulating the feathers over lapping each other..
Paint the beak

For the beak use paynes grey then add white and french ultramarine for the top of the beak. The tip has a touch of purple added.
The bright reflection in the centre indicated the separation between the top and bottom beaks. I add this line with white.
Paint the head
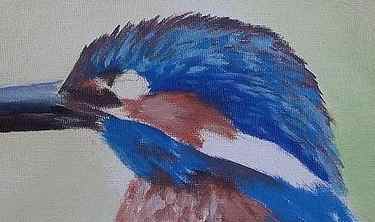
Now start blocking in the blue areas of the head using cerulean. Use the same purple from the beak to block in the dark areas on the head. Add white to the cerulean and start adding detail to the feathers on the head.

Notice how I am gradually covering the entire canvas with the various colours. I am also gradually using a smaller and smaller brush as each step needs finer detail. As a result the final white highlights are added using a fine liner.

To get the beak and head to meet just carefully look to see, what colour goes where and simply copy what you see. This area is too complicated to think about it, or analyse what each thing is.


