Becky Luigart-Stayner
15 Easy Fall Leaf Drawing Ideas – Fall Leaves Drawing
Learn how to draw fall leaves with these 15 easy leaf drawing ideas with step by step sketch guide, printables and coloring pages. Every season makes unique changes to the atmosphere and environments that make us realize the arrival of the particular season. Changing tree leaves, wild evening chills, and Halloween makes us feel special about the arrival of fall.
However, you can tell it in some other ways that fall in approaching like by fall leaves drawing, sure to be the best activity for kids for sure. However, this will be a great beginner project to draw a fall leaf, and you will learn so many different ways to draw it. It can be a part of so many different drawings and art projects for sure.
Explore these 15 easy fall leaf drawing ideas sharing the different strategies and hacks to quickly and efficiently draw a fall leaf. It will surely get you and all the kids into fall spirit to do these easy drawing projects, and they will surely help sharpen the kids’ artistic skills.

These projects will also help boost hand strength, focus, concentration, hand-eye coordination and creativity. Planning different strategies to outline the fall leaves to fill in custom details will help improve the kids’ problem-solving skills. From oak fall leaf to maple fall leaf to an autumn fall leaf, you will learn here to draw all like a pro.
You will also get guides here to draw the whole fall tree with falling leaves, realistic fall leaves, thanksgiving leaf drawing and outstanding fall leaf sketches. Take a quick tour of all these Fall Leaf Drawing Ideas to learn about a lot more innovative ways to draw a fall leaf like a pro.
How to Draw Fall Leaves Step by Step

Learn how to draw a simple leaf on the drawing paper yourself by following the step-by-step instructions and guidelines. We all love to sit in the home gardens and see the beautiful green trees, especially in spring. You will surely love working on this sketching idea if you are also one of them, especially with your kids. Indeed, it would be the best way to improve the artistic skills of your little crafters. Once you have done this drawing, you can also color it and use it for your kid’s room decor. iheartcraftythings
How to Draw Fall Oak Leaves

Are you searching for a fun-loving and efficient drawing activity to celebrate the Fall season? If yes, noting would be a better option than working on this Fall Oak leaf drawing project. Undoubtedly, kids can also work on this idea effortlessly and efficiently by following the instructions. Moreover, beginners and older crafters can sketch this thanksgiving leaf drawing on their drawing books to creatively spend their free time. Kids will enjoy and have more fun while coloring in this lead drawing. If you also want to work on it, you will need paper, a pencil, an eraser, a colored pencil and a sharpener. easydrawingguides
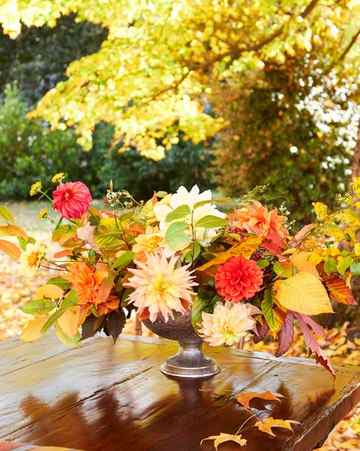
Fall Centerpiece
Becky Luigart-Stayner
You don’t need a special occasion to make this stunning arrangement. Start with a footed silver punch bowl and place a block of floral foam inside. Fill with dahlia stems and foraged foliage.
Stunning Tablescape

Becky Luigart-Stayner
This picture-perfect table is topped with a plaid wool blanket and surrounded with mismatched chairs for a come-as-you-are tone.
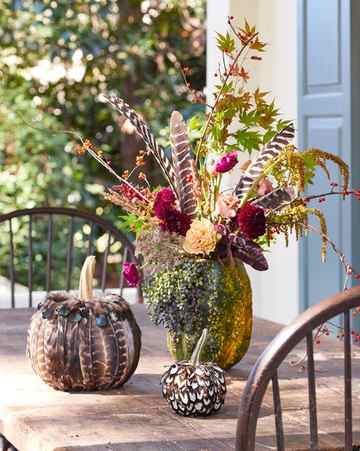
Plumed Arrangement
Becky Luigart-Stayner
Elevate your table with this unexpected arrangement. Hollow out a tall gourd such as a Hubbard squash, and slice a sliver off the bottom to help it stand. Place a piece of damp floral foam inside and fill with feathers, foliage, and flowers (here, roses and ranunculus). For the festooned pumpkins, use hot-glue to cover with long turkey (large) or pheasant (small) feathers. For the larger pumpkin, finish with wispy green chicken feathers around the crown.
Shop my Supplies Here:
*Disclosure: I only recommend products I would use myself and all opinions expressed here are my own. This post contains affiliate links from which, at no additional cost to you, I earn a small commission from.

I am working in my watercolor sketchbook today and sketch every leaf in pencil first. For the oak leaf we start with the centre line and a feather shape around that line. You can see in the photo how I used this shape as a guide to draw the leaf again with the funny little indents. After, you can add some little veining, some acorns and go over the final shape with the Pigma micron.
I am using the Pigma Micron .08 today because I want to create a really graphic drawing that I could maybe add some color to after. I always wiggle the pen a little so none of the leaves look too perfect and more natural. If you make a mistake, just go with it!

For the maple leaf, our guide consists of a center line, two small ovals for the bottom, and three larger ovals for the top. Once the guide is in place I give each oval section a couple little points and connect them. Once you get rid of some of those messy lines you can add veining in the center. After I’m happy with the leaf I just go over it in pen.
It is really hard to sit down and draw something out of nowhere. In most of my videos we begin with a pencil guide that gives you the basic form. Setting yourself up with a guide is a huge part of the illustration process.

The rest of our leaves are a little more simple. Still working in pencil, we create guides of the basic forms, a little more detail in pencil and then we go over it all with fine liner. If you follow along in the video you’ll see how I move the page around, add line shading and more detail in pens as we fill up the page.
For our heart shaped leaf it is as easy as that – a center line with a heart before adding the little teeth around the outside. The fern I create by adding individual little leaves along the center line, eventually letting the little leaves follow stems as you work your way down the center. When I go over it in pen I only trace the outside creating the long fern-like leaves. Our last is the easiest of all with matching pairs of oval leaves coming off of our center stem. That is a super simple one but it always looks good. I decided this wouldn’t be complete without adding a little stem of berries as well.

After erasing all of my messy lines I am ready to add some color! You could use chalk pastel, colored pencils, crayons, or watercolor if you used proper watercolor paper. I thought it would be fun to add some messy color in watercolor.
These illustrations are very graphic, they are thick black lines and don’t leave anything to the imagination. With the watercolor I am leaving a lot of negative space, being messy, I am having fun and being more illustrative with it. The clear forms are already there so I don’t need to add more detail with the paint. I added splashes of color to give this an even more Autumn feel. Of course, if you prefer, you can always just leave this in classic black and white.
Hope you are all enjoying Autumn and have some fun with this!