First things first, let’s start by talking about blending acrylic paint. That’s a key part of this painting after all!
Deep Woods Sunset – Acrylic Painting Lesson
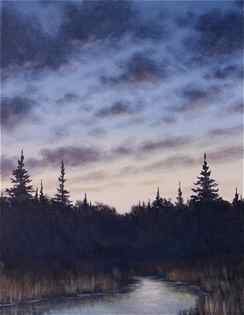
Learn to paint Deep Woods Sunset from start to finish in this roughly hour-long lesson. All aspects of this painting are covered in detail, from creating the clouds in the sky to the reflections in the water. You’ll find a lot of close up shots that show the proper brushstroke technique used to create the many shapes and highlights that make up this painting.
You may also like…
To purchase this lesson, click Add to Cart, then click Checkout, and follow the onscreen instructions. Once you’ve completed the order, you’ll be able to instantly access the lesson by clicking the blue button labeled with your display name in the upper-right and then selecting My Painting Lessons.
Note: DVD orders are shipped via First Class mail and should arrive within 5 to 7 business days.
With every Tim Gagnon Studio online lesson purchase, you receive:
- Immediate access – just purchase and begin painting
- Start to finish instruction – no cutouts – you’ll see every brushstroke of every painting
- Easy-to-learn techniques – develop skills to promote consistency in your style for a more professional look
- Unlimited viewing, no expiration – view the lesson as many times as you’d like, whenever you’d like
- Download the lesson directly to your hard drive for easy, offline access
- No expiration – once purchased, you’ll have access to the lesson forever
- FREE access to Critique Corner community – get/give advice, interact, and share photos of your work with other artists taking the same lesson
Tim Gagnon is the creator of online and DVD-based instructional art lessons for over 17,500 students in over 30 countries. In 2012, he was voted as one of the Top 50 Emerging Artists by Art Business News. His easy-to-learn instruction and unique, modern style has propelled him to one of the most followed artists in the United States.
Blending acrylic paint
One thing I’ll say from the off: don’t worry about creating a perfect, streak-free blend. A few streaks will just look like clouds and create a bit of realism. While realism isn’t really the goal of this project, it adds to the charm of the painting.
When you’re blending acrylic paint it’s best to work quickly. That’s especially true if it’s a hot day like it was when I recorded the video tutorial below!
I found it easiest to have a selection of brushes to hand. That way, you don’t have to try and wash your brush when you change colour, which will just slow you down and give the paint time to dry and become harder to blend!
Ideally, you’ll switch brushes after each blend. What I mean by that is you’ll blend the pink into the blue using one brush, then switch to blend the red into the pink, then again to blend the yellow into the red, and so on.
Doing this means your colours will stay bright and won’t get muddy. If you try and use the same brush, thinking you’ll be able to quickly wipe it off and continue painting, I can guarantee that by the time you’re painting the yellow section, it’ll have a slight hint of green due to there still being some blue somewhere in the depths of your brush.
I know this, because I’ve tried just to see if I could get away with just using one brush (I mean, who wouldn’t prefer to just wash one brush at the end of a painting project rather than five?!)

Choosing your colours
If I’ve said it once, I’ve said it a thousand times – I strongly encourage you to try this project using the paint you have already.
I’ve shared the exact colours I used so you can use those colours if you have them, but otherwise just use them as a reference.
Any blue, pink, red or yellow will work to make this sunset painting.
Adding the sun’s rays
You’ll notice the final step in the tutorial is adding a few rays of light coming from the sun.
I’d recommend practising on a scrap of paper rather than jumping straight into adding to your painting. This is because it can be easy to misjudge the amount of paint on the brush and the amount of pressure you’re using.
To make this easier, you’ll want a fairly dry brush without too much paint, so wipe any excess paint onto a paper towel after you’ve finished painting the sun.
The other important thing is to use very little pressure when you add the sun rays. And try to space them evenly around the sun. The idea is to create the suggestion of soft light radiating out from the sun as it sets, rather than distinct lines.
You know how a child draws the sun with lines coming off it? That’s not the effect we’re going for, as cute as it is!
How to Paint a Sunset
Ready to learn how to paint a sunset in just minutes? Keep reading for the instructions! If you are more of a visual learner, scroll down to the video towards the bottom of this post.
1) Find your inspiration
When you are painting, it can often help to have a source of inspiration or a visual to work off of. In this case, I chose a sunset photo I snapped on our last beach vacation. You can always look up images online, too if you need ideas!

2) Start with the background
Learning how to paint a sunset is really all about getting those beautiful background colors! When you look at the sky you’ll notice it’s usually a blend of colors – from a blue to orange or pink to another dark shade.
So, sometimes it’s just about choosing your colors and blending them a bit.
I started with a blue-gray on top and then went with a lighter orange underneath. I then went over the light orange with a darker, more vibrant shade of orange on top of the lighter shade.
Then at the bottom, I did a few shades of blue along with some silver to show the ocean reflecting.
There’s not always a rhyme or reason – it’s just about having fun and seeing what looks right!

3) Add the foreground
Next, I added some black for the beach area and the palm trees.
Typically, I’d let the canvas dry a bit before jumping in with the palm trees, but I’m painting on a schedule today, so just going for it. Alternatively, you could also use a blow drier to dry off the paint a bit faster.
Don’t be scared if it pulls some of the background color out – it’s okay! You can always go over it with more paint.

4) Layer in the details
Then, grab a small brush to add some detail to your palm trees. The depth of the leaves makes a big difference!
Again, don’t be worried if it pulls some of the background color in – I loved how the blue paint looked when mixed with the palm tree silhouette.
I also used the small brush to add some lights from above onto the beach. Just for fun!
5) Admire your hard work
There you have it! This isn’t a photorealistic painting, it’s almost cartoon-like and just for fun. Since I did this painting on a smaller canvas, I didn’t feel like I needed to add a ton of details. Had I made this on a larger scale, I would have.
How to Paint a Sunset: Watch the Video
Grab your supplies and come paint alongside me during this quick 10-minute video!
If you felt inspired by this, why not make some extra money while also exploring art? I was literally able to make an entire year’s salary between August – December by doing this, and you can too. Inside of Paint Party Headquarters, I’ll teach you everything I’ve learned over a decade of teaching paint parties.
Yes, it IS possible to make good money and love what you do! Learn how inside of PPHQ!
More Beach Painting Ideas

- How to Paint on A Surfboard: Cute Paint Party Project
- Paint a Colorful Beach Sunset: Step by Step Instructions
- Have Fun While Learning how To Paint a Whimsical Beach Scene
- Beach Sunset Tutorial from Start to Finish!
Share this:
- Click to share on Twitter (Opens in new window)
- Click to share on Facebook (Opens in new window)


