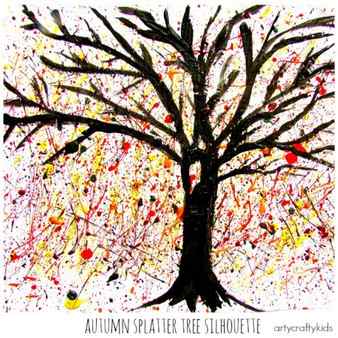
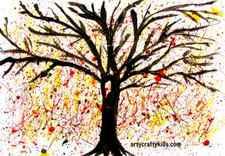
And here’s the result, a gorgeous Autumn Splatter Tree!
I am always on the look out for fun projects I can do with my daughter while my son is at school. She loves to have something to show off to her “bubba” when he gets home from school.

The other day while I was scrolling through Facebook I saw this fun project that used a bundle of Q-Tips to make a Fall Tree, I thought that was such a clever idea and knew I had the supplies already on hand (bonus!).
It is so simple even a caveman can do it…
You will need to gather the items below :
- Tiny handful of Q-Tips, small enough for little hands but large enough they have plenty to grab a hold of.
- Rubber band, or if you are like me and do not have rubber bands you can use an old hair tie.
- Card Stock or some sort of heavy duty art paper. We used a Watercolor paper because that is what I had on hand. You want the paper to be thicker so the paint won’t bleed through.
- Paint in fall colors. We used a Light Green, Dark Green, Dark Red, and Yellow. I would have used Orange too if I had any but I did not have any on hand. Luckily for us we live in South Texas so my kids didn’t realize Fall Trees have more orange in them. I also used Black for the tree trunk/branches.
- Paper plate to dump the paint on
- 1 paint brush to make the tree
- Also if you are like me you may want to get an apron of some sort to protect clothes. I have kid sized ones but they are currently still packed after our recent move, so I let her use my apron.

The first step was to draw the tree trunk and branches, I did that part for my daughter so that the end project would actually resemble a tree. If you have older painters you could probably let them be in charge of their own trees if they have a reference to look at.
Once I had the tree done I sat behind my daughter and helped her dip the end of her Q-Tip bundle in the paint, and showed her how to dot the paint onto the paper.

After a couple times with my help she got the hang of it so I let her go to town just making suggestions of where she should add paint to fill in blank spots.

Once she was happy with her tree she told me she was done, and we set it out on the table to dry. This was a really fun project that did not take hardly any time at all. From gathering the supplies to clean up maybe took a total of 30-45 minutes.
MATERIALS: Autumn Splatter Tree
This post contains affiliate links. Only quality and relevant products are featured.
White card (US / UK )
Tempera Paint (US / UK)
Paintbrush with firm Bristles (US / UK)
A plastic knife/ glue stick
Let’s Make It!

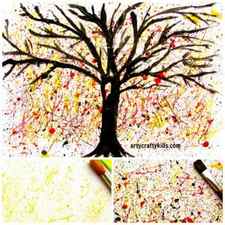
Using our Splat Painting technique, Miss O applied the first layer of paint.
Scraping a hard bristled brush against a plastic stick (of any form, I suggested a knife or glue stick) is a great way to control the splats.
You will achieve a better coverage and better splats!
Continue to build on the splats, using a variety of Autumn colours.
Keep going until the sheet of card is full and leave to dry before moving onto the next step.
TIP: Card tends to be a much better base for painting. Kids, especially little ones, like to add layer after layer of paint and often with lots of water! Using a firm base will prevent the painting becoming too soggy and potentially spoilt!
Once the splats are completely dry, start creating!
While Miss O decided to create an Autumn splatter tree, your kids may choose to paint something else!
Using black against a coloured background is amazingly effective for creating a silhouette.
I’m sure you’re kiddos will have their own ideas!
I hope your kids enjoy making their own Autumn splatter tree. If this is an idea you’ll come back to, make sure you pin it before you go and check out our collection of art ideas for kids!
Follow Arty Crafty Kids on Facebook, Pinterest and Instagram
Autumn Tree Modern Art Canvas Wall Painting

Description: This painting is the right canvas wall painting that you should hang in your living room, dining hall, or bedroom. The use of high-definition photo print technology on Matt finish canvas makes this wall canvas painting look like a real work of an experienced artist/painter. In the printing process, experts use HP Latex printing machine, which can do 6-colour painting. After installation, this eye-catchy canvas painting will help you improve the interior look of your home or office. Apart from decorating your home or commercial setup, you can present this wall canvas painting as a gift to your loved ones on any specific occasions such as birthday and holidays.Specifications:
– Dimension 48 x 24 inches for landscape painting
– Material Matt finish canvas fabric for painting and A Grade 18 x 40 mm natural American pine wood for frames
* Color Nature Wood Color(Frame)
* Finish Matt finish
* Technique High-definition photo print technology
* Machine used for printing HP Latex
* Ink Latex water base Eco-Friendly technology (Solvent free)
* Available With or Without Frame
Features:* Eye-catchy look
* Durable with a little care
* Easy to hang
* Works as a decorative and gifting piece
Hanging/Styling/Care/Maintenance tipsThis canvas wall painting comes with a user guide, which will help you how to hang it from the wall of a room in your office/home. Here are some tips that you can follow for hanging/styling/caring your painting:* Decide a wall place in your home and workplace
* Keep the nature of the painting in mind while deciding the place. For example, you should never hang a religious painting in a dining area or the kitchen
* Mark the area on the wall and do drilling if required
* Hang it well and adjust it after having a look at it watching it from a distance. Adjustment will help you make it look better
* Use a soft cotton cloth piece to clean the front of the painting. Press your clothed hand gently while cleaning
* Do cleaning work at twice two times a month for better look
SKU : DGBPFY/48×24/1080


